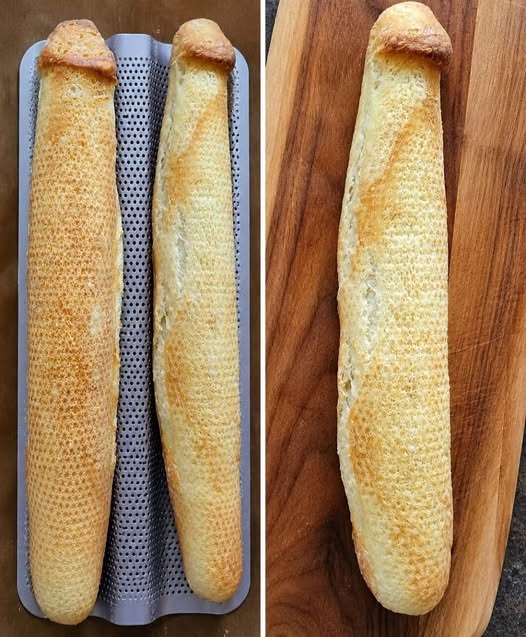

Bought a baguette mold because I thought, “Finally… perfectly straight baguettes!” 😂 Wellllll… apparently the mold had other plans! They looked nice and neat while baking, but the second I took them out… WHAT is this shape?! Apparently, perfectly straight baguettes were a little too much to ask for. But honestly, even when they come out a little wonky, homemade baguettes are still absolutely delicious.
These homemade French baguettes have a crisp, golden crust on the outside and a light, airy, chewy interior. They’re perfect for serving alongside soups, pasta, roasted meats, salads, or simply slicing open and spreading with butter.
The best part is that you don’t need complicated ingredients. A few pantry staples, some patience, and a hot oven are all you need.
Ingredients
- 500 grams bread flour
- 375 grams lukewarm water
- 10 grams salt
- 7 grams active dry yeast
- 1 teaspoon honey or granulated sugar
- 1 tablespoon olive oil, optional
- Extra flour, for shaping
- Cornmeal or rice flour, for dusting the baguette mold
Step 1: Activate the Yeast
Start by adding the lukewarm water to a large mixing bowl. The water should feel warm but not hot. If the water is too hot, it can damage the yeast.
Add the yeast and honey or sugar. Stir gently and let the mixture sit for about 5–10 minutes.
You should notice a little foam or bubbling on the surface. This is a good indication that your yeast is active.
If you’re using instant yeast, you can skip the activation step and mix it directly with the flour.
Step 2: Make the Dough
Add the bread flour to the yeast mixture. Sprinkle in the salt and add the olive oil if using.
Mix everything together with a wooden spoon, dough whisk, or your hands until no dry flour remains.
The dough will be sticky and somewhat loose. Don’t panic and don’t immediately add lots of extra flour. A wetter dough is one of the secrets to getting those beautiful air pockets inside a baguette.
Cover the bowl with plastic wrap, a reusable cover, or a clean kitchen towel.
Let the dough rest for about 20–30 minutes.
Step 3: Develop the Dough
Instead of aggressively kneading the dough, use a series of gentle stretch-and-folds.
With slightly wet hands, grab one side of the dough, stretch it upward, and fold it over the center. Rotate the bowl and repeat on the other sides.
Do this about 4 times.
Cover the bowl again and let it rest for another 20–30 minutes.
Repeat the stretch-and-fold process 2–3 more times.
As you continue, you’ll notice the dough becoming smoother, stronger, and more elastic.
Step 4: First Rise
Cover the dough and leave it at room temperature for approximately 1½–2 hours, depending on how warm your kitchen is.
The dough should become noticeably larger and filled with air.
You don’t necessarily need to wait for it to double completely. Look for a dough that has expanded significantly and feels light and bubbly.
For even more flavor, you can place the covered dough in the refrigerator overnight. A long, cold fermentation develops a deeper flavor and gives the baguettes a wonderful texture.
Step 5: Prepare the Baguette Mold
Lightly dust your baguette mold with flour, cornmeal, or rice flour.
A perforated baguette tray or mold can help support the dough while it rises and bakes, but don’t expect it to magically force the baguettes to remain perfectly straight!
The dough can still expand, twist, or spread as it bakes. And honestly, those imperfections are part of homemade bread.
If you don’t have a baguette mold, you can use a baking sheet lined with parchment paper. Simply create folds in the parchment between the baguettes to help them hold their shape.
Step 6: Divide the Dough
Turn the risen dough onto a lightly floured surface.
Try not to press all the air out of it.
Divide the dough into 2 or 3 equal portions, depending on how large you want your baguettes.
Gently shape each portion into a rough rectangle.
Let the pieces rest uncovered for about 10–15 minutes. This makes the dough easier to shape.
Step 7: Shape the Baguettes
Take one piece of dough and gently stretch it into a rectangle.
Fold the top third toward the center and press lightly.
Fold the bottom third over the top.
Then fold the dough in half lengthwise and seal the seam gently with your fingertips.
Using both hands, roll the dough back and forth from the center toward the ends, gradually extending it into a long baguette.
Try to keep the thickness as even as possible.
Don’t worry if they aren’t perfectly straight. Once the dough starts fermenting and baking, it may have a personality of its own!
Place each shaped baguette seam-side down in the prepared mold.
Step 8: Final Rise
Cover the shaped baguettes loosely with a clean kitchen towel.
Let them rise for approximately 30–45 minutes.
You don’t want them to become dramatically puffy. They should look lighter and slightly expanded.
While they’re rising, preheat your oven to 475°F (245°C).
For the best crust, place an empty metal baking pan on the bottom rack of the oven while it preheats.
Step 9: Score the Dough
This is one of the most important steps.
Using a very sharp bread lame or razor blade, make 3–4 diagonal cuts along the top of each baguette.
Hold the blade at a slight angle and make quick, confident cuts.
Don’t press the blade straight down. The angled cuts help create the classic baguette appearance and give the dough room to expand in the oven.
Step 10: Create Steam
Place the baguettes in the hot oven.
Immediately pour about 1 cup of boiling water into the preheated metal pan on the bottom rack, then quickly close the oven door.
Be extremely careful when adding water because hot steam can cause burns.
The steam helps keep the crust flexible during the first part of baking, allowing the baguettes to expand properly and develop a beautiful crisp crust.
Bake at 475°F for about 10 minutes.
Then carefully remove the steam pan, reduce the oven temperature to 450°F (230°C), and continue baking for another 15–20 minutes.
The baguettes should become deeply golden brown and sound hollow when tapped underneath.
Step 11: Cool Completely
Remove the baguettes from the mold and place them on a wire rack.
This is the hardest part: don’t slice them immediately!
Allow them to cool for at least 30 minutes.
As the baguettes cool, the interior continues setting and the crust becomes wonderfully crisp.
If you cut them too early, the inside can become gummy.
Tips for Better Baguettes
Use bread flour: Bread flour has more protein than regular all-purpose flour and helps create a stronger dough with better structure.
Don’t add too much flour: Sticky dough is normal. Adding excessive flour can make the finished bread dense and heavy.
Give the dough time: Good baguettes aren’t really about rushing. Fermentation is what develops the flavor and texture.
Use steam: Steam is one of the biggest secrets to achieving a thin, crispy crust.
Don’t overproof: If the dough becomes extremely soft and collapses easily, it may have fermented too long.
Don’t obsess over appearance: A homemade baguette doesn’t have to look factory-perfect. If yours bends, twists, or spreads a little, that’s completely okay.
How to Serve
These baguettes are best served fresh. Slice them and spread with salted butter, use them for sandwiches, or serve them with soup, stew, pasta, or a cheese board.
You can also turn leftover baguette into garlic bread, croutons, breadcrumbs, or French toast.
And if your baguettes come out looking a little… creative like mine, don’t worry. The goal is crispy, golden, delicious bread—not a baguette beauty contest!
Homemade bread doesn’t have to be perfect to be absolutely delicious.