
If you are looking for a beautiful homemade cake that is completely gluten-free but still soft, moist, fluffy, and delicious, this gluten-free celebration cake is a perfect choice. A good gluten-free cake should never feel dry or crumbly, and this recipe is designed to give you a tender texture with plenty of moisture and a light vanilla flavor. It can be baked as a simple layered cake and decorated with smooth buttercream, chocolate ganache, sprinkles, fresh fruit, flowers, or any design you prefer. The recipe is versatile enough for birthdays, holidays, anniversaries, family gatherings, or simply when you want a beautiful homemade dessert without gluten.
For the cake, you will need 2 cups gluten-free all-purpose flour blend, 1 1/2 teaspoons baking powder, 1/2 teaspoon baking soda, 1/2 teaspoon salt, 1 cup granulated sugar, 1/2 cup unsalted butter softened to room temperature, 3 large eggs, 2 teaspoons vanilla extract, 3/4 cup buttermilk, and 1/4 cup vegetable oil. If your gluten-free flour blend does not already contain xanthan gum, add approximately 1/2 teaspoon xanthan gum to help provide structure and prevent the cake from becoming crumbly. Make sure every ingredient and decorating product you use is labeled gluten-free if you are preparing the cake for someone who must strictly avoid gluten.
Begin by preheating your oven to 350°F (175°C). Grease two 8-inch round cake pans and line the bottoms with parchment paper. Lightly dust the sides with gluten-free flour or use additional parchment paper. Preparing the pans properly makes it much easier to remove the cakes after baking without damaging their delicate texture.
In a medium bowl, whisk together the gluten-free flour, baking powder, baking soda, salt, and xanthan gum if needed. Mix the dry ingredients thoroughly so the leavening agents are evenly distributed throughout the flour. Set the bowl aside while you prepare the wet ingredients.
In a large mixing bowl, beat the softened butter and sugar together for approximately 3 to 4 minutes. The mixture should become lighter in color and fluffy in texture. This step helps incorporate air into the batter and contributes to a lighter cake. Add the eggs one at a time, mixing well after each addition. Add the vanilla extract and vegetable oil and mix until everything is smooth and well combined.
Gradually add the dry ingredients to the wet mixture, alternating with the buttermilk. Begin with approximately one-third of the flour mixture, followed by half of the buttermilk. Continue alternating until all ingredients have been added. Mix only until the batter becomes smooth. Avoid overmixing because gluten-free cakes can become dense if the batter is worked excessively.
Divide the batter evenly between the prepared cake pans. Smooth the tops with a spatula and gently tap the pans on the counter once or twice to remove large air bubbles. Place the pans in the preheated oven and bake for approximately 25 to 30 minutes. The exact baking time may vary depending on your oven and pan size.
The cakes are ready when the tops are lightly golden, the centers spring back when gently pressed, and a toothpick inserted into the middle comes out clean or with a few moist crumbs. Do not overbake the cakes because gluten-free cakes can lose moisture quickly. Once baked, remove the pans from the oven and allow the cakes to cool in the pans for approximately 10 minutes.
Carefully remove the cakes from the pans and transfer them to a wire rack. Allow them to cool completely before decorating. If the cakes are still warm, the frosting can melt and slide off, so patience is important.
For a simple vanilla buttercream, you will need 1 cup unsalted butter softened to room temperature, 4 cups powdered sugar, 2 teaspoons vanilla extract, 2 to 4 tablespoons heavy cream or milk, and a small pinch of salt. Beat the butter until creamy and smooth. Gradually add the powdered sugar while mixing on low speed. Add the vanilla, salt, and two tablespoons of cream. Increase the mixer speed and beat for approximately 2 to 3 minutes until the frosting becomes light and fluffy. Add additional cream if necessary until you reach a smooth, spreadable consistency.
For a chocolate version, replace approximately 1/2 cup of the powdered sugar with unsweetened cocoa powder. You can also add melted and cooled gluten-free chocolate for a richer chocolate flavor. Another option is to prepare a simple chocolate ganache using gluten-free chocolate and heavy cream and pour it over the finished cake for a glossy finish.
Once the cakes are completely cool, place the first layer on a cake board or serving plate. Spread an even layer of buttercream across the top. Place the second cake layer on top and gently press it into position. Apply a thin layer of frosting around the entire cake to create a crumb coat. Refrigerate the cake for approximately 20 to 30 minutes to allow this first layer of frosting to firm up.
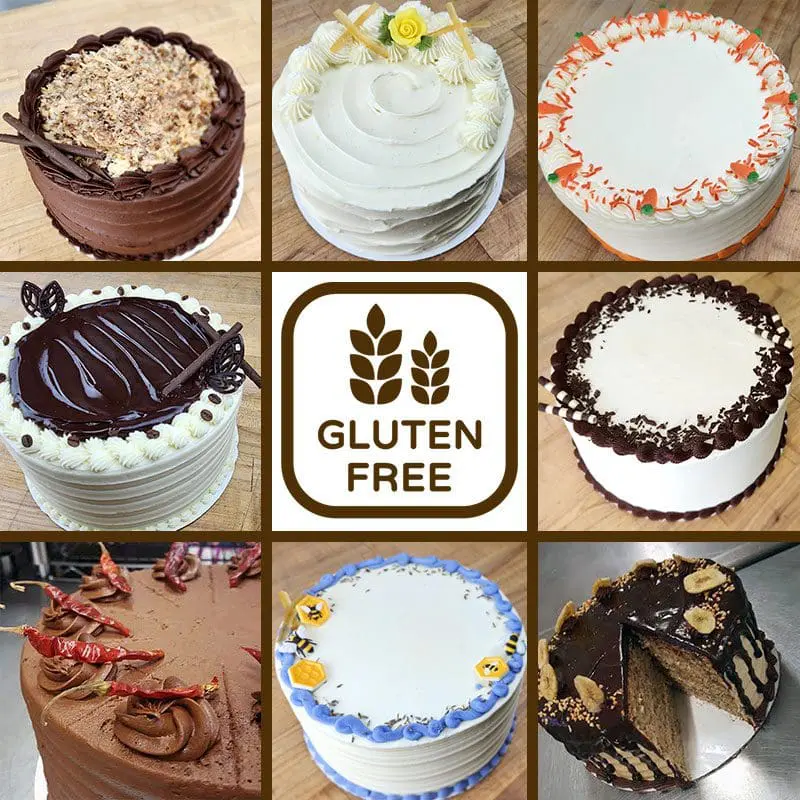
After chilling, apply the remaining buttercream to the cake. Use a cake scraper or offset spatula to create a smooth finish. You can leave the sides perfectly smooth or create decorative ridges, depending on the look you want. The cakes shown in the image can be recreated with simple piped borders, chocolate decorations, sprinkles, colorful buttercream flowers, or a glossy chocolate topping.
For a classic birthday cake, pipe small buttercream swirls around the top edge and decorate the center with colorful sprinkles. For a chocolate celebration cake, spread chocolate ganache over the top and allow it to drip slightly down the sides. Add chocolate curls, chopped nuts, or small pieces of gluten-free chocolate for extra decoration. For a spring or floral design, use pastel-colored gluten-free buttercream to pipe flowers and leaves around the edges.
If you want to make the cake extra moist, you can brush each cake layer lightly with a simple syrup before adding the frosting. To make the syrup, combine equal amounts of water and sugar in a small saucepan and heat until the sugar dissolves. Allow it to cool completely before brushing a small amount over the cake layers. This is especially helpful when preparing the cake a day ahead.
One of the most important tips for gluten-free baking is choosing the right flour blend. A high-quality gluten-free flour blend designed for cakes usually contains a combination of rice flour, starches, and other gluten-free ingredients that provide a balanced texture. Avoid using a single gluten-free flour such as coconut flour or almond flour as a direct one-to-one replacement unless the recipe has specifically been developed for it, because these flours absorb liquid differently.
It is also important to prevent cross-contamination if the cake is being prepared for someone with celiac disease or a serious gluten intolerance. Use clean bowls, utensils, pans, mixers, and decorating tools that have not been contaminated with regular wheat flour. Check labels on baking powder, powdered sugar, chocolate, sprinkles, food coloring, and other decorations to ensure they are suitable for a gluten-free diet.
The finished cake can be stored covered at room temperature for approximately two days if your frosting is suitable for room-temperature storage. For longer storage, refrigerate it in an airtight cake container for up to five days. Allow refrigerated cake to sit at room temperature for about 20 to 30 minutes before serving so the frosting softens and the cake develops its best texture.
This gluten-free celebration cake is a delicious example of how gluten-free baking can still produce a soft, moist, beautiful, and bakery-style dessert. With a tender vanilla cake, creamy buttercream, and endless decorating possibilities, you can easily customize it for any occasion. Whether you prefer a classic white cake, rich chocolate frosting, colorful decorations, or an elegant minimalist design, this recipe gives you a reliable base that is easy to personalize. Slice it, serve it with coffee or tea, and enjoy a homemade gluten-free dessert that everyone at the table can share.