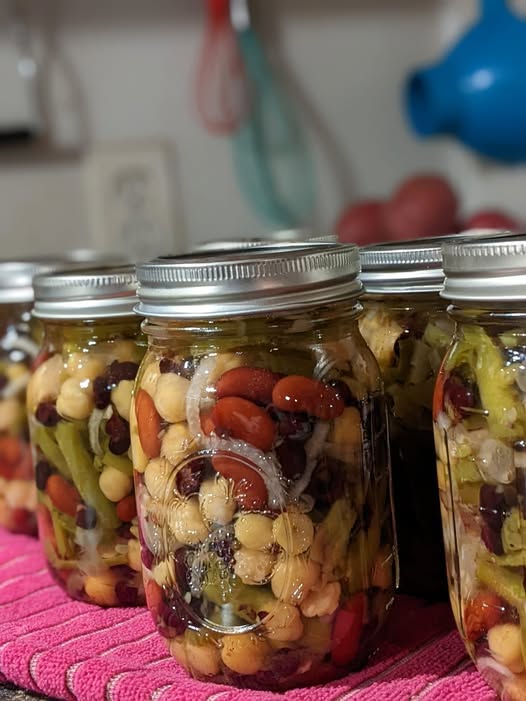

A Classic Homemade Pickled Bean Salad with Vinegar Brine
This homemade Canned 4 Bean Salad is a colorful, tangy, sweet, and crunchy addition to your pantry. Made with black beans, green beans, kidney beans, chickpeas, and onions, this old-fashioned bean salad is preserved in a flavorful vinegar brine with sugar and pickling spices. Every jar is packed with delicious beans and vegetables that soak up the sweet-and-sour flavor of the brine.
It is perfect for summer picnics, family gatherings, holiday dinners, potlucks, and everyday meals. Serve it chilled as a side dish, add it to a salad bowl, or enjoy a spoonful whenever you want something tangy and satisfying.
Recipe in the comments!
Ingredients
For the Bean Salad
- 2 cups cooked black beans, drained and rinsed
- 2 cups cooked or commercially canned green beans, drained and cut into bite-sized pieces
- 2 cups cooked kidney beans, drained and rinsed
- 2 cups cooked chickpeas, drained and rinsed
- 1 medium yellow onion, thinly sliced
- 1 teaspoon mustard seeds, optional
- 1 teaspoon celery seeds, optional
- 1 teaspoon whole black peppercorns, optional
For the Vinegar Brine
- 3 cups white vinegar with 5% acidity
- 3 cups water
- 1 cup granulated sugar
- 2 tablespoons pickling spice
- 1 teaspoon salt, optional, depending on taste
Important food-safety note: This recipe is for refrigerator bean salad unless you use a tested canning recipe specifically approved for these ingredients and proportions. Do not store jars at room temperature based on this recipe alone.
Instructions
Step 1: Prepare the Beans
Begin by preparing all four types of beans. If you are using canned beans, open the cans, pour the beans into a colander, and rinse them thoroughly under cool running water. Allow the excess water to drain away.
If you are using dried beans, cook each variety until tender according to its package instructions before preparing the salad. Green beans should be cooked until tender but still retain some texture.
Try not to mash the beans while mixing. Keeping them whole gives the finished salad a beautiful appearance and a more enjoyable texture.
Step 2: Prepare the Onion
Peel the onion and slice it into thin rings or strips. Thinly sliced onions distribute their flavor throughout the salad and absorb the sweet-and-sour brine beautifully.
If you prefer a milder onion flavor, separate the slices into individual rings and briefly rinse them with cool water. Drain thoroughly before adding them to the beans.
Step 3: Make the Sweet-and-Sour Brine
In a medium saucepan, combine the white vinegar, water, granulated sugar, pickling spice, and optional salt.
Place the saucepan over medium heat and stir until the sugar dissolves completely. Bring the mixture to a gentle boil, stirring occasionally to make sure the ingredients are well combined.
Once the sugar has dissolved, remove the saucepan from the heat. Allow the brine to cool before pouring it over the beans for refrigerator storage.
The vinegar provides the signature tangy flavor, while the sugar balances the acidity. Pickling spices add a warm, aromatic taste that makes this traditional bean salad especially flavorful.
Step 4: Combine the Beans and Vegetables
Place the black beans, green beans, kidney beans, chickpeas, and sliced onions in a large mixing bowl.
Add the optional mustard seeds, celery seeds, and black peppercorns if desired. Gently toss everything together using a large spoon.
Mix carefully so that the beans remain intact. The combination of dark black beans, red kidney beans, pale chickpeas, green beans, and onion creates a colorful mixture that looks beautiful in glass jars.
Step 5: Fill the Jars
Wash clean glass jars and their lids thoroughly. For refrigerator storage, clean jars are suitable when handled hygienically, although they are not a substitute for a validated canning process.
Spoon the bean mixture into the jars, leaving a little space at the top. Distribute the beans and onions evenly so that every jar contains a colorful variety of ingredients.
Pour the cooled vinegar brine over the mixture until the beans are covered. Use a clean spoon to gently release trapped air bubbles and make sure the ingredients are submerged.
Wipe the jar rims clean and close the jars with their lids. Do not invert the jars or rely on a sealed lid to prove that the contents are safe for shelf storage.
Step 6: Refrigerate and Allow the Flavors to Develop
Place the sealed jars in the refrigerator promptly. Keep them refrigerated at 40°F (4°C) or below.
Allow the salad to chill for at least 24 hours before serving. For a more developed flavor, let it rest for 48 hours, provided it remains properly refrigerated.
During this time, the beans absorb the sweet, tangy brine, and the onions become pleasantly mellow. The result is a refreshing salad with a delicious balance of acidity, sweetness, and savory bean flavor.
Step 7: Serve and Enjoy
When you are ready to serve, remove a jar from the refrigerator and spoon the desired amount into a serving bowl.
This bean salad pairs wonderfully with grilled chicken, roasted vegetables, sandwiches, burgers, and other picnic favorites. You can also add a little chopped parsley or fresh dill just before serving for extra freshness.
For a simple variation, add thinly sliced bell peppers or a small amount of finely chopped celery. Keep any additions refrigerated with the salad.
Storage Tips
- Keep the jars refrigerated at all times.
- Use clean utensils whenever serving the salad.
- Follow a conservative refrigerator-storage period of about 3–4 days for this homemade version.
- Discard the salad if it develops mold, an unusual odor, unexpected bubbling, or other signs of spoilage.
- Do not store these jars in a cupboard, pantry, or at room temperature.
- For shelf-stable canned bean salad, follow a current, scientifically tested recipe from a reliable home-canning authority. Beans and other low-acid vegetables require special processing, and a vinegar brine alone does not establish that a recipe is safe for water-bath canning.
Helpful Tips for the Best Bean Salad
Choose firm beans: Beans that hold their shape make the salad look attractive and prevent the brine from becoming cloudy with mashed beans.
Balance the sweetness: If you enjoy a more traditional sweet bean salad, use the specified amount of sugar. Do not reduce the vinegar or alter the proportions of a tested preservation recipe.
Keep everything submerged: Beans exposed above the brine may dry out or spoil more quickly. Use a clean utensil to keep the mixture evenly covered.
Let the flavors develop: Chilling the salad overnight gives the vinegar, sugar, onions, and pickling spices time to blend.
Make it your own: Mustard seeds, celery seeds, peppercorns, and fresh herbs can add different flavor notes to a refrigerator salad.
Frequently Asked Questions
Can I use canned beans?
Yes. Canned beans are convenient for refrigerator bean salad. Drain and rinse them well before mixing.
Can I make this salad ahead of time?
Yes. Preparing it a day before serving allows the flavors to develop. Keep it refrigerated.
Is this recipe suitable for pantry storage?
No. The proportions given here are for a refrigerator salad, not a validated shelf-stable canning recipe. Use a tested canning recipe and its exact processing instructions if you want to preserve jars at room temperature.
What can I serve with four-bean salad?
It goes well with grilled meats, sandwiches, burgers, roasted potatoes, and other picnic or barbecue dishes.
Final Thoughts
Canned 4 Bean Salad brings together colorful beans, crisp onions, a sweet-and-sour vinegar brine, and fragrant pickling spices in one simple homemade recipe. It is easy to prepare, convenient to serve, and versatile enough for everyday meals or special gatherings.
Prepare a batch, chill it until the flavors come together, and enjoy this classic tangy bean salad as a refreshing side dish. Keep it refrigerated for safe storage, and use a tested preservation recipe whenever you want a shelf-stable canned version.
Save this recipe and share it with someone who loves homemade pickled salads!