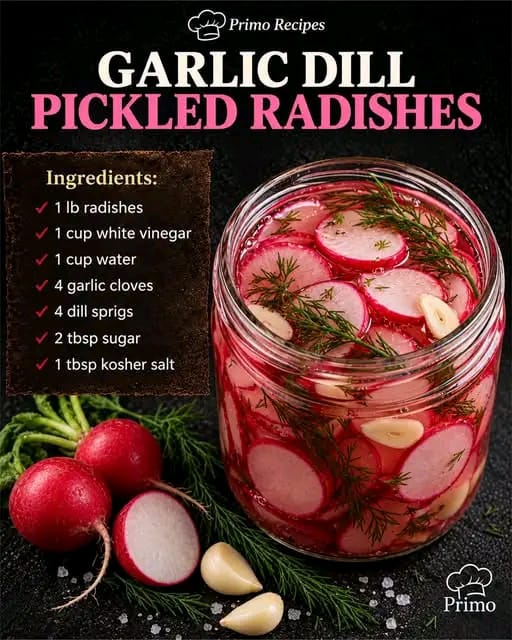

Garlic Dill Pickled Radishes are a delicious homemade pickle recipe that transforms fresh, crunchy radishes into a tangy, flavorful, and beautifully colorful treat. Thinly sliced radishes are packed into a glass jar with fresh garlic cloves and fragrant dill sprigs, then covered with a simple homemade vinegar brine made with white vinegar, water, sugar, and kosher salt. As the radishes soak, they gradually develop a gorgeous rosy-pink color while absorbing all the delicious garlic and dill flavors.
If you love homemade pickles, quick refrigerator vegetables, and easy ways to add extra flavor to everyday meals, this recipe is definitely worth trying. These pickled radishes are incredibly simple to prepare, require only a handful of everyday ingredients, and are ready to enjoy after a little time in the refrigerator. Their crisp texture and bright, tangy flavor make them a wonderful addition to sandwiches, burgers, salads, wraps, and snack boards.
Why You’ll Love These Garlic Dill Pickled Radishes
There are so many reasons to keep a jar of homemade pickled radishes in your refrigerator. First, the recipe is wonderfully simple. You don’t need complicated equipment, special ingredients, or hours of preparation. A few fresh radishes, garlic, dill, and a quick vinegar brine are all you need.
The flavor is another reason to love them. Radishes have a naturally peppery taste, but pickling gives them a refreshing tanginess that balances their sharp flavor. Fresh garlic adds a savory aroma, while dill brings a classic pickle flavor that makes every bite delicious.
They also look beautiful! The naturally pink radish slices develop an even deeper rosy color as they sit in the brine. When packed into a clear glass jar with fresh dill and garlic, they make a colorful addition to your refrigerator and a lovely homemade treat to serve to guests.
Ingredients You’ll Need
1. Fresh Radishes (1 pound)
Fresh radishes are the star of this recipe. Choose firm, bright-colored radishes without soft spots or wrinkles. Wash them thoroughly, remove the leafy tops and roots, and slice them into thin, even rounds.
2. White Vinegar (1 cup)
White vinegar creates the tangy pickling brine and gives the radishes their classic pickle flavor. It also helps preserve their bright color and refreshing taste.
3. Water (1 cup)
Water balances the acidity of the vinegar and creates a well-rounded brine that allows the radishes to absorb the other flavors.
4. Garlic Cloves (4 cloves)
Fresh garlic adds a delicious savory flavor. Peel the garlic cloves and slice them or leave them whole, depending on your preference.
5. Fresh Dill Sprigs (4 sprigs)
Dill gives these pickled radishes their wonderful fresh, herby aroma. Fresh dill is especially delicious in homemade refrigerator pickles.
6. Sugar (2 tablespoons)
A little sugar balances the sharpness of the vinegar and creates a pleasant sweet-and-tangy flavor without making the pickles overly sweet.
7. Kosher Salt (1 tablespoon)
Salt brings all the flavors together and helps create a delicious, well-seasoned pickling brine.
How to Make Garlic Dill Pickled Radishes
Step 1: Prepare the Radishes
Begin by washing the radishes thoroughly under cool running water. Remove the green tops and small root ends. Pat them dry with a clean kitchen towel.
Using a sharp knife or mandoline slicer, cut the radishes into thin, even rounds. Try to keep the slices approximately the same thickness so they absorb the brine evenly. Thinner slices will pickle more quickly, while slightly thicker slices will retain a firmer crunch.
Step 2: Prepare the Glass Jar
Choose a clean glass jar with a tight-fitting lid. Wash the jar thoroughly with hot, soapy water and rinse well.
Place the sliced radishes inside the jar, arranging them neatly. Add the peeled garlic cloves and fresh dill sprigs between the layers. Distributing the garlic and dill throughout the jar helps every slice absorb their wonderful flavors.
Leave a little space at the top of the jar so there is enough room for the pickling liquid.
Step 3: Make the Pickling Brine
In a small saucepan, combine the white vinegar, water, sugar, and kosher salt.
Place the saucepan over medium heat and stir gently until the sugar and salt have dissolved completely. Bring the mixture just to a gentle simmer, stirring occasionally.
Once everything has dissolved, remove the saucepan from the heat. Allow the brine to cool slightly before pouring it over the radishes.
Step 4: Add the Brine
Carefully pour the warm pickling liquid into the prepared jar. Make sure the radish slices, garlic, and dill are completely covered with the liquid.
If a few slices float to the surface, gently press them down using a clean utensil. Close the jar with its lid once the liquid has cooled sufficiently.
Step 5: Refrigerate and Let the Flavors Develop
Allow the jar to cool to room temperature, then transfer it to the refrigerator.
For the best flavor, let the radishes pickle for at least 24 hours before serving. During this time, they will absorb the garlic, dill, and tangy vinegar flavors while developing their beautiful pink appearance.
The flavor will continue to develop over the next few days, making them even more delicious.
Helpful Tips for Perfect Pickled Radishes
- Choose fresh radishes: Firm, fresh radishes give you the best crunchy texture.
- Slice evenly: Uniform slices pickle more consistently and look beautiful in the jar.
- Use fresh garlic: Freshly peeled garlic gives the brine a richer flavor.
- Don’t skip the dill: Fresh dill adds that familiar homemade pickle taste.
- Keep everything submerged: Make sure the radishes stay covered with the pickling liquid.
- Give them time: Although they can be tasted after a few hours, waiting at least 24 hours produces a better flavor.
- Use a clean jar: Always start with a thoroughly cleaned glass container and clean utensils.
How to Serve Garlic Dill Pickled Radishes
These delicious pickled radishes are surprisingly versatile. Their crisp texture and tangy flavor make them perfect for adding a little extra excitement to everyday meals.
Serve them alongside grilled chicken, roasted vegetables, sandwiches, burgers, or tacos. They are also wonderful chopped into potato salads, green salads, grain bowls, and wraps.
For a simple snack, arrange a few slices on a cheese and cracker board with olives, cucumber slices, and your favorite cheeses. You can also add them to homemade sandwiches for a refreshing crunch.
If you enjoy making homemade condiments, keep a jar ready whenever you want something flavorful to brighten up lunch or dinner.
Storage Instructions
Because this is a quick refrigerator pickle recipe, the radishes must be stored in the refrigerator rather than on a pantry shelf.
Keep them in a clean, tightly covered glass jar and make sure the radishes remain submerged in the brine. Always use a clean fork or spoon when removing them.
For the best quality, enjoy them within approximately 2 to 3 weeks, and discard them if you notice mold, unusual odors, or other signs of spoilage. This recipe has not been tested for shelf-stable canning, so do not store the jars at room temperature.
Frequently Asked Questions
How long do pickled radishes take to be ready?
They can be tasted after several hours, but 24 hours in the refrigerator is recommended for a more developed flavor. Waiting another day or two allows the garlic and dill to infuse the radishes even further.
Do pickled radishes stay crunchy?
Yes! Fresh, firm radishes generally retain a pleasant crunch when prepared as refrigerator pickles. Cutting them too thin or leaving them in warm brine for too long can soften their texture.
Can I use dried dill instead of fresh dill?
Fresh dill is recommended for its bright flavor and beautiful appearance. However, dried dill can be used if fresh dill is unavailable. Start with a smaller amount because dried herbs have a more concentrated flavor.
Why do radishes turn pink?
Radishes naturally contain red and pink pigments in their skins. When sliced and soaked in vinegar brine, these pigments spread through the liquid and give the radishes their beautiful rosy-pink appearance.
Can I adjust the sweetness?
Yes. The recipe uses 2 tablespoons of sugar to balance the vinegar. You can slightly adjust the sweetness to suit your taste, although keeping the original proportions gives you the intended flavor.
Final Thoughts
These Garlic Dill Pickled Radishes are proof that a few simple ingredients can create something incredibly delicious. With crisp radish slices, fresh garlic, fragrant dill, and a perfectly balanced vinegar brine, this easy homemade recipe is a wonderful way to enjoy radishes in a completely different way.
Whether you’re preparing them for sandwiches, adding them to a dinner spread, or simply enjoying a few straight from the jar, these rosy little pickles are sure to become a favorite. Make a batch, let the flavors develop in the refrigerator, and enjoy a fresh, tangy, crunchy addition to your favorite meals!