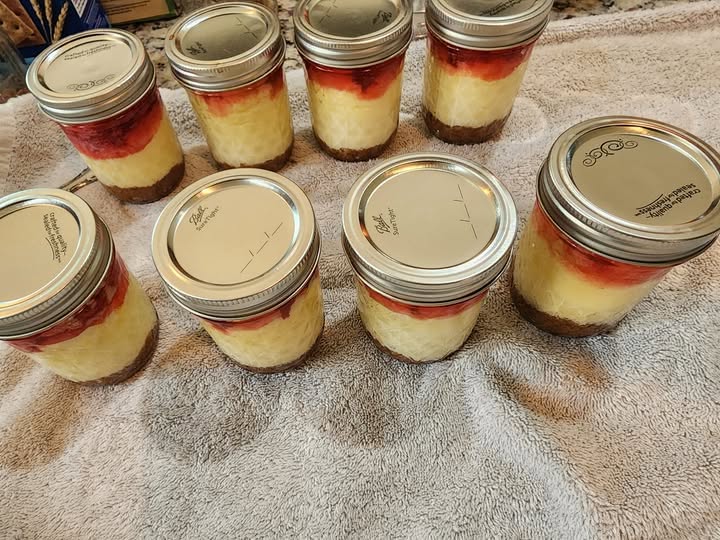

Homemade Strawberry Cheesecake Jars are a delicious and beautiful dessert made with layers of buttery graham cracker crumbs, rich and creamy cheesecake filling, and sweet strawberry topping. These little desserts are perfect for anyone who loves homemade cheesecake but wants something simple, convenient, and easy to serve. Each jar has a crunchy cookie crust at the bottom, a smooth and fluffy cheesecake layer in the middle, and a generous layer of fruity strawberry topping on top.
The best part about making cheesecake in individual jars is that there is no need to bake a traditional cheesecake or worry about slicing and serving it. Everything is already portioned into individual servings, making these little treats perfect for family gatherings, parties, potlucks, holidays, and special occasions. They also look beautiful when arranged together on a dessert table.
This recipe is easy to prepare with simple ingredients that come together to create a rich, creamy, and flavorful dessert. You can prepare the jars ahead of time and keep them refrigerated until you are ready to serve. Whether you are making them for your family or sharing them with friends, these homemade strawberry cheesecake jars are sure to become a favorite.
Ingredients
For the Graham Cracker Crust
-
2 cups graham cracker crumbs
-
5 tablespoons unsalted butter, melted
-
2 tablespoons granulated sugar
-
1 teaspoon vanilla extract
For the Cheesecake Filling
-
16 ounces cream cheese, softened
-
1 cup powdered sugar
-
1 teaspoon vanilla extract
-
1 tablespoon fresh lemon juice
-
1 cup heavy whipping cream, cold
-
2 tablespoons sour cream (optional)
For the Strawberry Topping
-
2 cups fresh strawberries, chopped
-
1/3 cup granulated sugar
-
1 tablespoon lemon juice
-
1 teaspoon cornstarch
-
1 tablespoon water
-
1/2 teaspoon vanilla extract
Instructions
Step 1: Prepare the Graham Cracker Crust
Start by preparing the crunchy base for your cheesecake jars. Place the graham crackers into a food processor and pulse until they become fine crumbs. If you do not have a food processor, place the crackers inside a sealed plastic bag and crush them with a rolling pin.
Transfer the crumbs to a medium-sized mixing bowl. Add the melted butter, granulated sugar, and vanilla extract. Stir everything together until the crumbs are evenly coated and resemble wet sand.
The melted butter helps hold the crumbs together while giving the crust a delicious buttery flavor. Spoon approximately 2 tablespoons of the mixture into the bottom of each clean glass jar. Gently press the crumbs down using the back of a spoon to create an even layer.
Place the prepared jars in the refrigerator while you make the cheesecake filling.
Step 2: Make the Creamy Cheesecake Filling
In a large mixing bowl, add the softened cream cheese. Beat with an electric mixer until completely smooth and creamy. Make sure your cream cheese is at room temperature before mixing because cold cream cheese can create lumps.
Add the powdered sugar, vanilla extract, lemon juice, and sour cream if using. Continue mixing until everything is well combined and the mixture becomes smooth.
In a separate chilled bowl, beat the cold heavy whipping cream until stiff peaks form. This usually takes a few minutes with an electric mixer. Be careful not to overbeat the cream.
Gently fold the whipped cream into the cream cheese mixture using a spatula. Continue folding until the filling becomes light, fluffy, and evenly combined.
The cheesecake mixture should be thick enough to hold its shape when spooned into the jars. Its smooth texture is what makes every bite taste rich and delicious.
Step 3: Prepare the Strawberry Topping
Wash the strawberries thoroughly, remove the green tops, and chop them into small pieces.
Place the strawberries in a small saucepan along with the granulated sugar and lemon juice. Cook over medium-low heat for approximately 5 to 8 minutes, stirring occasionally.
As the strawberries cook, they will release their natural juices and become soft. In a small bowl, mix the cornstarch with water until smooth. Pour this mixture into the saucepan and stir well.
Continue cooking for another 1 to 2 minutes until the strawberry sauce thickens slightly. Remove the saucepan from the heat and stir in the vanilla extract.
Allow the strawberry topping to cool completely before adding it to the cheesecake jars. The topping should be thick, fruity, and slightly chunky.
Step 4: Assemble the Cheesecake Jars
Remove the jars containing the graham cracker crust from the refrigerator.
Carefully spoon or pipe the cheesecake filling over the prepared crust. Fill each jar until you have a beautiful, even cheesecake layer. Using a piping bag makes this step easier and helps keep the inside of the jars neat.
Gently smooth the tops with the back of a spoon if necessary.
Once the cheesecake filling is in place, add a generous spoonful of the cooled strawberry topping over each jar. Spread it gently to create an attractive red layer across the top.
You should now have three beautiful layers: buttery graham cracker crumbs, creamy cheesecake filling, and sweet strawberry topping.
Step 5: Chill and Serve
Cover each jar with a clean lid or suitable food-safe cover. Place the jars in the refrigerator for at least 4 hours, although overnight chilling will give them an even better texture.
During this time, the cheesecake filling will become firmer, the flavors will blend together, and the crust will soften slightly.
Serve the cheesecake jars chilled straight from the refrigerator. You can add a fresh strawberry, a little whipped cream, or additional graham cracker crumbs before serving.
Tips for Perfect Strawberry Cheesecake Jars
-
Always use softened cream cheese to achieve a smooth filling without lumps.
-
Use cold heavy whipping cream for the best whipped texture.
-
Allow the strawberry topping to cool completely before adding it to the cheesecake layer.
-
Do not add too much melted butter to the crust, as it can become overly firm after chilling.
-
Use clear glass jars to show off the beautiful layers.
-
Chill the jars for at least 4 hours before serving.
-
Adjust the sugar in the strawberry topping depending on how sweet your strawberries are.
How to Store Strawberry Cheesecake Jars
Store the finished cheesecake jars covered in the refrigerator for up to 3 days for the best quality. Keep them refrigerated at 40°F (4°C) or below, and avoid leaving them at room temperature for extended periods.
These cheesecake jars are refrigerator desserts, not shelf-stable canned foods. Do not process them in a water bath or pressure canner, and do not store them at room temperature simply because they have sealed lids.
Frequently Asked Questions
Can I make these cheesecake jars ahead of time?
Absolutely! These jars are perfect for preparing ahead. You can assemble them the night before and refrigerate them until serving time.
Can I use frozen strawberries?
Yes. Thaw the strawberries first and drain excess liquid if necessary. Then cook them with the sugar and lemon juice to make the topping.
Can I use a different fruit topping?
Of course! Blueberries, raspberries, cherries, peaches, and mixed berries all work wonderfully with the creamy cheesecake filling.
How long should the cheesecake jars chill?
At least 4 hours is recommended. Overnight chilling is even better if you want a firmer cheesecake texture.
Final Thoughts
These Homemade Strawberry Cheesecake Jars are everything you want in a delicious homemade dessert. They are creamy, fruity, buttery, and perfectly sweet, with three beautiful layers in every little jar. They are easy to prepare, convenient to serve, and wonderful for sharing with the people you love.
Once you make these individual cheesecake desserts, you will find plenty of reasons to make another batch. They are a lovely addition to celebrations, family dinners, holiday gatherings, or simply when you want something sweet waiting in the refrigerator!