
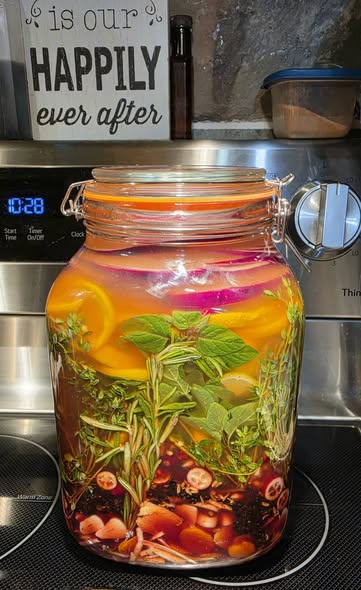

Homemade Fire Cider is a traditional herbal vinegar infusion made with fresh roots, herbs, citrus fruits, garlic, and other flavorful ingredients. It is known for its beautiful golden-orange color, bold flavor, and combination of aromatic ingredients. Making it at home is a wonderful way to experiment with different herbs and create a colorful infusion using ingredients from your kitchen.
I finally decided to make a couple of batches of homemade Fire Cider after doing plenty of research. I wanted to combine several herbs and fresh ingredients, and I absolutely love how beautiful the jars look after just two weeks. The citrus slices, fresh rosemary, thyme, mint, garlic, ginger, and colorful berries create such a gorgeous presentation.
This recipe is inspired by traditional Fire Cider preparations. Although some people use it as a home remedy, there is no strong scientific evidence that Fire Cider treats gastroparesis or improves stomach emptying. Because this particular version contains acidic vinegar, raw garlic, ginger, and potentially spicy ingredients, anyone with severe gastroparesis should check with their healthcare professional before consuming it.
Why You Will Love This Homemade Fire Cider
- Beautiful natural colors: Fresh citrus, herbs, and berries create a gorgeous infusion.
- Fresh ingredients: Made with recognizable kitchen ingredients and aromatic herbs.
- Easy preparation: Most of the work involves washing, slicing, and combining everything in a jar.
- Customizable: You can adjust the combination of herbs and citrus to suit your preferred flavor.
- Traditional preparation: Uses an apple cider vinegar base to extract flavors from the ingredients.
Ingredients
- 2 cups raw apple cider vinegar, or enough to completely cover the ingredients
- 1 medium orange, thinly sliced
- 1 lemon, thinly sliced
- 1 small red onion, thinly sliced
- 1/2 cup fresh cranberries
- 1 whole garlic bulb, cloves peeled and lightly crushed
- 1 medium piece fresh ginger, sliced
- 1 small piece fresh turmeric root, sliced
- 3 sprigs fresh rosemary
- 4 sprigs fresh thyme
- A handful of fresh mint leaves
- 1 tablespoon black peppercorns
- 1–2 fresh chili peppers, optional
- 2 tablespoons raw honey, optional, added after straining
Equipment Needed
- One large, clean glass jar with a tight-fitting lid
- A sharp knife and cutting board
- Measuring cups
- A clean spoon
- Cheesecloth or a fine-mesh strainer
- A clean glass bottle for storing the finished infusion
Instructions
Step 1: Prepare the Ingredients
Begin by washing the oranges, lemon, fresh herbs, cranberries, ginger, and turmeric thoroughly under clean running water. Pat everything dry with a clean kitchen towel.
Peel the garlic cloves and lightly crush them to release their natural aroma. Slice the ginger and turmeric into thin pieces. Cut the orange, lemon, and red onion into thin slices.
If you are using fresh chili peppers, slice them carefully and remove the seeds if you prefer a milder flavor. Rinse the rosemary, thyme, and mint, and allow them to dry completely.
Preparing everything before assembling the jar makes the entire process much easier.
Step 2: Prepare the Glass Jar
Choose a large glass jar that can comfortably hold all the ingredients. Wash it thoroughly with hot, soapy water and allow it to dry completely.
Make sure the jar is suitable for vinegar storage. Avoid using a metal lid that will come into direct contact with the acidic vinegar unless it has a suitable protective lining.
Step 3: Add the Fresh Ingredients
Start by placing some of the garlic, ginger, turmeric, and cranberries at the bottom of the jar.
Add the red onion slices, followed by the fresh rosemary and thyme. Arrange the orange and lemon slices around the sides of the jar so they remain visible through the glass.
Add the mint leaves, black peppercorns, and optional chili peppers.
You can arrange the ingredients in layers to create a beautiful appearance similar to the photograph. The different colors and textures make this homemade infusion look especially attractive.
Step 4: Pour in the Apple Cider Vinegar
Slowly pour the apple cider vinegar into the jar until all the ingredients are completely submerged.
Use a clean spoon to gently press down any ingredients that are floating above the vinegar.
It is important that the ingredients remain covered. Use enough vinegar to fill the spaces between the herbs, citrus, and other ingredients.
Step 5: Seal and Store
Close the jar using its appropriate vinegar-resistant lid. Place it in a cool, dark location away from direct sunlight.
For a traditional preparation, some recipes allow the ingredients to infuse for approximately 3–4 weeks, occasionally shaking the jar gently.
Check the jar regularly for signs of spoilage, including mold, unusual textures, or unpleasant odors. If anything looks or smells spoiled, discard the entire batch.
Step 6: Strain the Mixture
After the desired infusion period, strain the mixture through clean cheesecloth or a fine-mesh strainer into a clean glass container.
Press the ingredients gently to release the remaining liquid, then discard the solids.
The finished vinegar should have a beautiful golden, orange, and reddish color depending on the ingredients used.
Step 7: Add Honey (Optional)
If you enjoy a slightly sweeter flavor, you can stir in raw honey after straining.
Start with a small amount and adjust according to your taste. Mix thoroughly until the honey is incorporated.
Keep the finished preparation refrigerated and follow appropriate food-safety guidance for homemade infused vinegar preparations.
Helpful Tips for Making Fire Cider
- Always begin with clean, dry ingredients and a properly cleaned glass jar.
- Use enough vinegar to completely cover the fresh ingredients.
- Arrange the citrus slices along the sides of the jar for an attractive layered appearance.
- Fresh rosemary and thyme add a wonderful herbal aroma.
- Cranberries contribute a beautiful reddish color.
- Avoid allowing ingredients to remain exposed above the vinegar.
- Do not consume a preparation that shows signs of mold or spoilage.
How to Store Homemade Fire Cider
Once strained, transfer the finished infusion into a clean, food-safe glass bottle or jar. Keep it refrigerated and use clean utensils whenever handling it.
Because this recipe contains fresh, low-acid ingredients and has not been laboratory-tested for shelf stability, do not assume it is safe for long-term room-temperature storage. Refrigeration does not eliminate every food-safety risk.
Important Note About Gastroparesis
Although Fire Cider is popular in traditional home-remedy recipes, it is not an established treatment for gastroparesis. In fact, vinegar, citrus, raw garlic, ginger, chili, and other strong ingredients may aggravate nausea, reflux, abdominal discomfort, or other symptoms in some people.
With severe gastroparesis, please consult your gastroenterologist or dietitian before trying this preparation. Making it does not mean you need to drink it, and it should not replace prescribed treatment.
Final Thoughts
There is something so satisfying about preparing homemade herbal infusions with fresh ingredients. I especially love how the orange and lemon slices, colorful cranberries, garlic, and beautiful green herbs look together inside the glass jar.
After just two weeks, the colors are already gorgeous, and I am excited to see how the infusion develops over time. Making homemade Fire Cider is a lovely way to explore traditional herbal preparations, experiment with fresh ingredients, and enjoy the process of creating something from scratch.
If you make your own batch, remember to use safe preparation and storage practices, and always consider your individual dietary needs before consuming it!