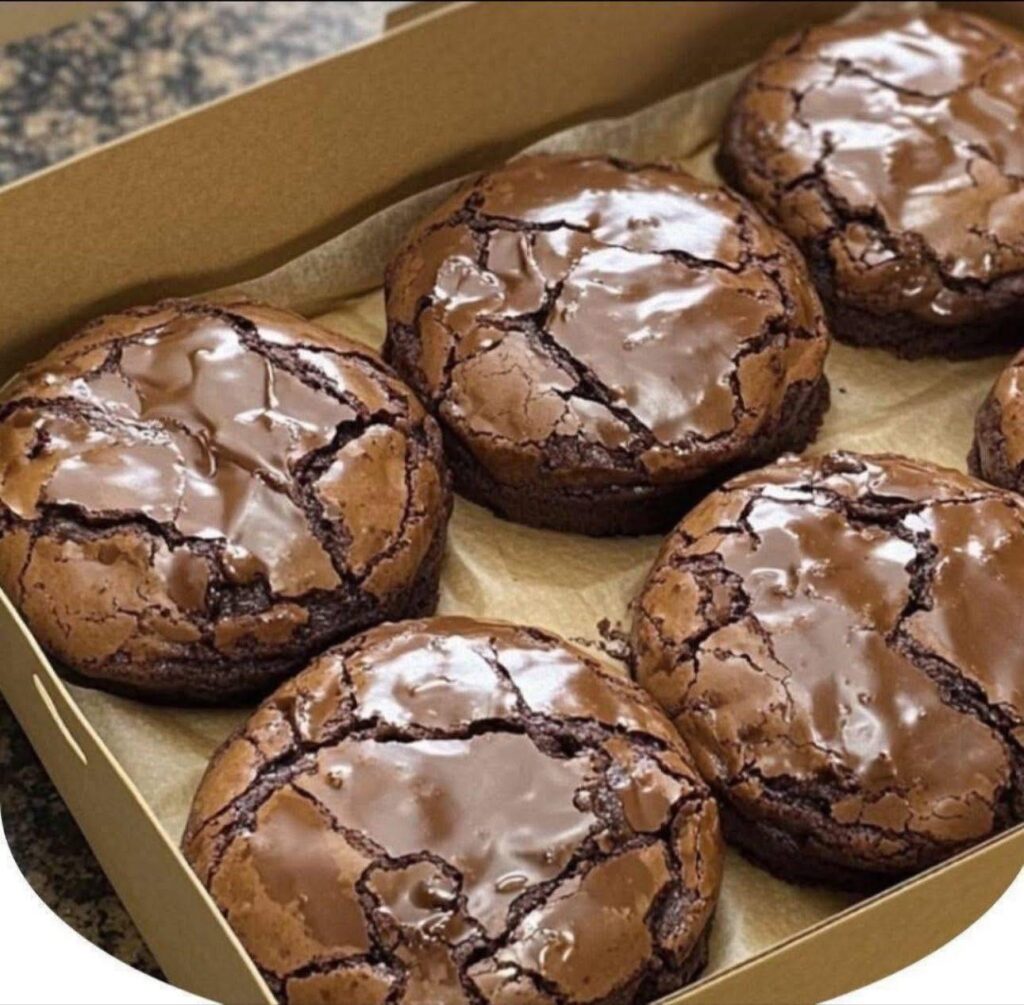

If you love brownies and chocolate cookies, this Fudgy Chocolate Brownie Cookies recipe combines the best of both worlds. These cookies have a shiny, crackly top just like a classic brownie, while the inside stays incredibly soft, chewy, and rich with deep chocolate flavor. Every bite is packed with a fudgy center and slightly crisp edges, making them the perfect dessert for chocolate lovers. Whether you’re baking for a family gathering, holiday celebration, birthday party, or simply satisfying a chocolate craving, these brownie cookies are guaranteed to become one of your favorite homemade treats. They are easy to prepare using simple pantry ingredients and deliver bakery-style results every single time. Their beautiful glossy tops and irresistible texture make them look as impressive as they taste, and once you bake a batch, you’ll find yourself making them again and again.
Why You’ll Love This Recipe
These brownie cookies are incredibly rich, soft, and chocolatey. They have the signature crackled brownie top, a chewy center, and slightly crispy edges that create the perfect balance of textures. Unlike ordinary chocolate cookies, these are packed with melted chocolate, giving them an intense cocoa flavor that melts in your mouth. They are easy enough for beginners yet impressive enough to serve at parties or gift during the holidays. The cookies stay soft for several days, making them an excellent make-ahead dessert.
Ingredients
1 cup semi-sweet chocolate chips
4 ounces dark chocolate, chopped
½ cup unsalted butter
2 large eggs
1 cup granulated sugar
½ cup light brown sugar
1 teaspoon pure vanilla extract
1 cup all-purpose flour
¼ cup unsweetened cocoa powder
1 teaspoon baking powder
½ teaspoon salt
½ cup chocolate chips for folding into the batter
Optional: ½ cup chopped walnuts or pecans
Kitchen Equipment
Large mixing bowl
Medium microwave-safe bowl or saucepan
Electric hand mixer or stand mixer
Whisk
Rubber spatula
Baking sheet
Parchment paper
Cookie scoop
Cooling rack
Preparing the Chocolate
Begin by placing the butter, dark chocolate, and one cup of semi-sweet chocolate chips into a microwave-safe bowl. Heat in short 20-second intervals, stirring well after each interval until everything is completely melted and smooth. If you prefer, you can melt the mixture over a double boiler on the stovetop. Set the melted chocolate aside and allow it to cool slightly while preparing the remaining ingredients. This step ensures the eggs will not cook when mixed into the warm chocolate.
Mixing the Wet Ingredients
In a large mixing bowl, combine the granulated sugar, brown sugar, eggs, and vanilla extract. Beat the mixture using an electric mixer for about four to five minutes until it becomes pale, thick, and fluffy. This step is very important because it creates the signature shiny, crackly tops that brownie cookies are famous for. Once the egg mixture is light and airy, slowly pour in the cooled melted chocolate while mixing on low speed until fully incorporated.
Combining the Dry Ingredients
In a separate bowl, whisk together the flour, cocoa powder, baking powder, and salt until evenly combined. Gradually add the dry ingredients to the chocolate mixture, stirring gently with a rubber spatula until no streaks of flour remain. Be careful not to overmix the batter because overmixing can make the cookies dense instead of soft and fudgy. Fold in the remaining chocolate chips and, if desired, the chopped walnuts or pecans for extra texture and flavor.
Chilling the Dough
Cover the bowl with plastic wrap and refrigerate the dough for about thirty to forty-five minutes. Chilling makes the dough easier to scoop and helps the cookies maintain their thick, bakery-style shape while baking. Although it may be tempting to skip this step, chilling greatly improves the final texture and appearance.
Baking Instructions
Preheat your oven to 350°F (175°C). Line a baking sheet with parchment paper to prevent sticking and ensure even baking. Using a cookie scoop or tablespoon, place portions of dough about two inches apart on the prepared baking sheet. Bake for ten to twelve minutes or until the tops are shiny and cracked while the centers remain slightly soft. Do not overbake, as the cookies will continue to cook while cooling on the baking sheet. Allow them to rest for five minutes before transferring them to a wire rack to cool completely.
Serving Suggestions
These rich brownie cookies are delicious served slightly warm with a glass of cold milk or a cup of freshly brewed coffee. They also pair wonderfully with vanilla ice cream, creating an indulgent dessert that everyone will love. For special occasions, drizzle melted chocolate over the cooled cookies or dust them lightly with powdered sugar. You can even sandwich vanilla buttercream or chocolate ganache between two cookies to create irresistible brownie cookie sandwiches.
Helpful Baking Tips
Use high-quality chocolate because it significantly improves the flavor of the finished cookies. Measure the flour carefully by spooning it into the measuring cup instead of scooping directly from the bag to avoid adding too much flour. Beat the eggs and sugar thoroughly to achieve the signature glossy tops. Allow the melted chocolate to cool slightly before combining it with the eggs. Chill the dough before baking for thicker cookies, and avoid overbaking because slightly underbaked centers create the perfect fudgy texture.
Flavor Variations
These cookies are incredibly versatile and can be customized in many delicious ways. Add white chocolate chips for a sweet contrast to the rich chocolate flavor. Stir in peanut butter chips for a chocolate peanut butter version. Crushed peppermint candies make a festive holiday variation, while espresso powder enhances the chocolate flavor without making the cookies taste like coffee. Mini marshmallows can also be folded into the dough for a fun rocky road-inspired treat.
Storage Instructions
Store the cooled cookies in an airtight container at room temperature for up to five days. Place a slice of bread inside the container to help keep the cookies soft and chewy. For longer storage, freeze the baked cookies in a freezer-safe container for up to three months. Allow them to thaw at room temperature before serving, or warm them in the microwave for a few seconds to enjoy a freshly baked taste.
Frequently Asked Questions
Many home bakers ask why their brownie cookies do not develop shiny, crackly tops. The secret is beating the eggs and sugar until thick and fluffy before adding the melted chocolate. This creates the delicate crust during baking. Another common question is whether the dough can be prepared in advance. Yes, the dough can be refrigerated overnight, making it convenient for baking fresh cookies the next day. If the dough becomes too firm after chilling overnight, simply let it sit at room temperature for ten to fifteen minutes before scooping.
Some people also wonder if milk chocolate can replace dark chocolate. While it can, dark chocolate produces a richer, more intense brownie flavor. Semi-sweet chocolate is an excellent compromise if you prefer a slightly sweeter cookie.
Nutritional Information
Each cookie contains approximately 210 calories, 11 grams of fat, 27 grams of carbohydrates, 17 grams of sugar, 3 grams of protein, and 95 milligrams of sodium. Nutritional values may vary depending on the specific brands of ingredients used and the size of each cookie.
Final Thoughts
These Fudgy Chocolate Brownie Cookies are everything a chocolate dessert should be—rich, soft, chewy, and loaded with deep chocolate flavor. Their glossy crackled tops, tender brownie-like centers, and slightly crisp edges make them a standout treat for every occasion. Whether you are baking for family, entertaining guests, preparing holiday cookie trays, or simply treating yourself, this easy homemade recipe delivers bakery-quality cookies with minimal effort. Once you taste these irresistible brownie cookies fresh from the oven, they are sure to become a permanent favorite in your dessert collection and a recipe you’ll proudly share with friends and family for years to come