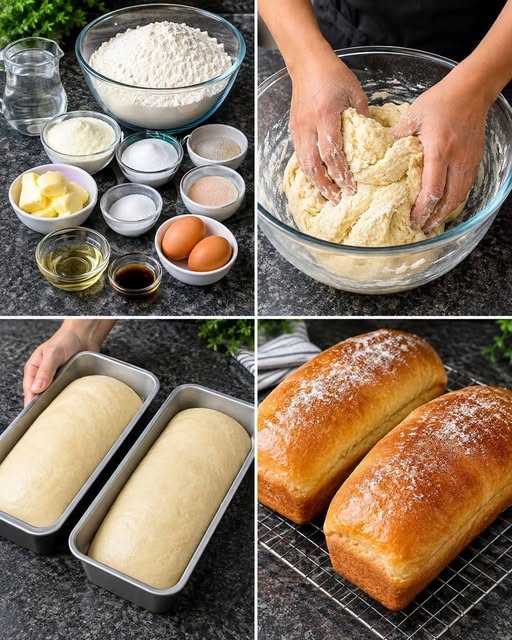

There is nothing quite like the smell of freshly baked homemade bread filling the kitchen. This soft homemade milk bread is tender, fluffy, lightly sweet, and has a beautiful golden-brown crust. The inside is soft enough for sandwiches but sturdy enough for toast, making it a wonderful everyday bread for the whole family.
This recipe makes two soft sandwich-style loaves. The dough is enriched with milk, eggs, butter, and sugar, which gives the bread its soft texture, rich flavor, and beautiful golden color. Once baked, the loaves are delicious warm with butter, but they are also perfect for breakfast, lunch sandwiches, French toast, or simply enjoying with jam.
Ingredients
For the Bread Dough
- 4 cups all-purpose flour or bread flour
- 2 ¼ teaspoons active dry yeast
- 1 cup warm milk
- ¼ cup warm water
- ¼ cup granulated sugar
- 2 large eggs
- 4 tablespoons unsalted butter, softened
- 1 teaspoon salt
- 1 teaspoon vanilla extract, optional
For the Egg Wash
- 1 large egg
- 1 tablespoon milk
For Finishing
- 1 tablespoon melted butter
- Powdered sugar, optional
Instructions
1. Prepare the Yeast
Begin by warming the milk and water. They should be comfortably warm to the touch, but they should not be hot. Extremely hot liquid can damage the yeast and prevent the bread from rising properly.
Pour the warm milk and water into a large mixing bowl. Add the sugar and active dry yeast. Stir gently and let the mixture sit for approximately 5–10 minutes.
The yeast should begin to foam or look slightly bubbly on top. This means the yeast is active and ready to use. If there is no activity at all after several minutes, check the expiration date of the yeast before continuing.
2. Add the Wet Ingredients
Once the yeast mixture is ready, add the two eggs and softened butter.
If you want a subtle sweet bakery-style flavor, add the vanilla extract as well. Whisk or stir the ingredients together until the eggs are fully incorporated and the butter is distributed throughout the mixture.
The butter doesn’t need to be completely melted. Softened butter will work perfectly.
3. Add the Flour
Add about 3 ½ cups of flour along with the salt. Stir everything together with a wooden spoon or sturdy spatula.
The mixture will gradually turn into a sticky, soft dough. Add the remaining flour little by little rather than adding everything at once.
Depending on the type of flour you use, your kitchen temperature, and humidity, you may need slightly more or slightly less flour.
The most important thing is not to make the dough too stiff. The finished dough should be soft and slightly tacky but should still be manageable.
4. Knead the Dough
Transfer the dough onto a lightly floured work surface.
Knead the dough for approximately 8–10 minutes. Push the dough forward with the heel of your hand, fold it back toward yourself, turn it slightly, and repeat.
As you knead, the dough should become smoother, softer, and more elastic.
If the dough is sticking heavily to your hands and work surface, add a small amount of flour at a time. Avoid adding large amounts because too much flour can make the finished bread dense instead of light and fluffy.
You can also use a stand mixer fitted with a dough hook. Knead on low to medium speed for about 7–9 minutes, or until the dough becomes smooth and elastic.
5. First Rise
Shape the kneaded dough into a smooth ball.
Lightly grease a large bowl with a little oil or butter and place the dough inside. Turn it once so the outside is lightly coated.
Cover the bowl with plastic wrap or a clean kitchen towel.
Place the bowl somewhere warm and draft-free and let the dough rise for approximately 1 to 1½ hours, or until it has doubled in size.
The exact rising time can vary. If your kitchen is warm, the dough may rise faster. If your kitchen is cool, it may take longer.
Don’t worry if the dough takes a little longer than expected. The important thing is that it visibly doubles in size.
6. Shape the Loaves
Once the dough has doubled, gently press it down to release some of the trapped air.
Transfer it to a lightly floured work surface and divide it into two equal pieces.
Take the first piece and gently flatten it into a rough rectangle.
Fold the sides toward the center and then begin rolling the dough tightly from one end to the other. Try to keep the roll fairly even so the finished loaf rises evenly.
Pinch the seam closed and place the dough seam-side down into a greased 9×5-inch loaf pan.
Repeat the same process with the second piece of dough.
You should now have two shaped loaves sitting comfortably inside their pans.
7. Second Rise
Cover the loaf pans loosely with a clean kitchen towel or plastic wrap.
Allow them to rise for another 35–60 minutes.
The dough should become noticeably puffy and should rise close to the top of the loaf pans.
Don’t rush this stage. The second rise is one of the most important steps for getting a soft, airy loaf.
If the dough is under-proofed, the bread can turn out dense. If it is allowed to rise too much, it may collapse during baking.
8. Prepare the Oven
While the loaves are completing their second rise, preheat your oven to 350°F (175°C).
Position the oven rack in the center of the oven so both loaves can bake evenly.
9. Brush With Egg Wash
Prepare the egg wash by whisking together one egg and one tablespoon of milk.
Once the loaves have finished their second rise, gently brush the tops with the egg wash.
Try to brush lightly so you don’t deflate the risen dough.
The egg wash will give the bread its beautiful shiny, golden-brown finish as it bakes.
10. Bake the Bread
Place both loaf pans into the preheated oven.
Bake for approximately 25–32 minutes, depending on your oven.
The tops should become beautifully golden brown. The bread should also sound slightly hollow when gently tapped.
Keep an eye on the loaves during the final 10 minutes. If the tops are becoming too dark before the bread is fully baked, loosely cover them with aluminum foil.
Avoid opening the oven repeatedly because large temperature changes can affect the rise.
11. Add the Butter
Once the bread is finished baking, remove the pans from the oven.
Let the loaves cool in their pans for about 10 minutes.
Carefully remove them from the pans and place them on a wire rack.
While the bread is still warm, brush the tops with melted butter. This helps soften the crust and gives the loaves a delicious buttery finish.
If you like a slightly sweeter presentation, you can add a very light dusting of powdered sugar after the bread has cooled.
12. Cool Before Slicing
It can be tempting to cut into freshly baked bread immediately, but allowing it to cool first will give you much better slices.
Let the loaves cool for at least 30–45 minutes before slicing.
As the bread cools, the inside continues to set. Cutting it too early can make the center appear gummy or cause the slices to become compressed.
Once cooled, use a sharp bread knife to cut the loaf into even slices.
Tips for Perfect Homemade Bread
Don’t add too much flour. This is one of the most important tips for soft homemade bread. A dough that feels slightly sticky is usually better than a dough that is stiff and dry.
Use fresh yeast. If your yeast doesn’t become foamy after being mixed with warm liquid and sugar, it may not be active anymore.
Don’t make the liquid too hot. Warm liquid is ideal. Very hot milk or water can prevent the yeast from working.
Give the dough enough time to rise. Rising time depends on the temperature of your kitchen, so use the appearance of the dough as your guide rather than watching the clock alone.
Knead properly. Good kneading develops gluten, which helps the bread hold its shape and creates that soft, stretchy texture.
Don’t skip the second rise. The second rise helps create the light and fluffy crumb that makes homemade sandwich bread so good.
Watch the oven. Every oven is slightly different. If your bread browns quickly, cover it loosely with foil toward the end of baking.
Serving Ideas
This bread is incredibly versatile.
Serve thick slices warm with butter and honey for a simple breakfast. You can also spread it with strawberry jam, raspberry preserves, peanut butter, or your favorite fruit spread.
For lunch, use it to make turkey and cheese sandwiches, chicken salad sandwiches, grilled cheese, or classic ham and cheese.
The bread also makes excellent French toast. Because the loaf is soft and slightly rich, it absorbs the egg mixture beautifully without falling apart.
For an easy breakfast, toast a slice until golden and top it with butter, scrambled eggs, avocado, or cream cheese.
You can even cut the bread into cubes and use it to make homemade bread pudding.
Storage
Allow the bread to cool completely before storing it.
Keep the loaf in an airtight container or tightly wrapped at room temperature for up to 3 days.
For longer storage, slice the bread and place it in a freezer-safe bag. Remove as much air as possible before sealing.
The bread can be frozen for approximately 2–3 months.
If you freeze individual slices, place parchment paper between them so you can easily remove only the amount you need.
Frozen slices can be toasted directly from the freezer, making homemade bread convenient even on busy mornings.
Final Result
The finished bread should have a beautiful golden crust, a soft and fluffy center, and a light buttery sweetness. When sliced, the inside should be tender and airy rather than heavy or dry.
Making bread at home may seem intimidating at first, but once you understand the basic process—activate the yeast, mix the dough, knead, let it rise, shape, rise again, and bake—it becomes surprisingly simple.
This recipe is especially good for beginners because the enriched dough is forgiving and produces two beautiful loaves. Once you make it successfully, you can experiment with different flavors by adding cinnamon, raisins, herbs, cheese, or even a little honey.
Fresh from the oven with a little butter melting over the top, this homemade milk bread is hard to beat. It is soft, comforting, and perfect for keeping on hand throughout the week.