
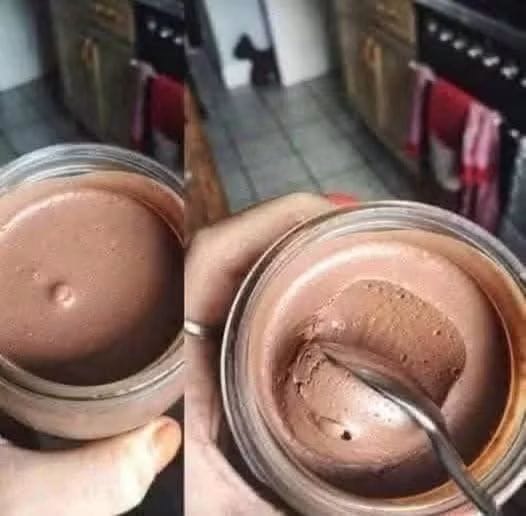

If you love chocolate desserts and creamy cheesecake, this Chocolate Cheesecake Mousse is the perfect treat! It’s rich, silky, smooth, and full of delicious chocolate flavor with a subtle tanginess from cream cheese. Every spoonful tastes like a combination of chocolate cheesecake and fluffy chocolate mousse.
The best part is that this dessert requires no baking. Simply combine a few ingredients, whip everything until smooth and fluffy, and refrigerate until perfectly chilled. Serve it in mason jars, dessert glasses, or small bowls for a beautiful homemade dessert that’s perfect for family gatherings, holidays, parties, or whenever you’re craving something sweet.
Ingredients
For the Chocolate Cheesecake Mousse
-
8 oz (225 g) cream cheese, softened
-
½ cup powdered sugar
-
¼ cup unsweetened cocoa powder
-
1 teaspoon vanilla extract
-
4 oz (115 g) semi-sweet chocolate, melted and cooled
-
1 cup heavy whipping cream, cold
-
2 tablespoons milk, if needed
-
A pinch of salt
Optional Toppings
-
Chocolate shavings
-
Mini chocolate chips
-
Whipped cream
-
Crushed chocolate cookies
-
Chocolate syrup
-
Fresh strawberries
Instructions
Step 1: Prepare the Cream Cheese
Take the cream cheese out of the refrigerator approximately 30–45 minutes before preparing the mousse. It should be softened to room temperature but not melted.
Place the softened cream cheese in a large mixing bowl. Using an electric hand mixer, beat it for 2–3 minutes until smooth, creamy, and free of lumps.
This step is important because softened cream cheese creates a silky mousse texture. Cold cream cheese can leave small lumps throughout the dessert.
Step 2: Add the Sugar and Cocoa Powder
Add the powdered sugar, unsweetened cocoa powder, vanilla extract, and a pinch of salt to the cream cheese.
Start mixing on low speed to prevent the cocoa powder and sugar from scattering. Gradually increase the speed and beat until everything is fully incorporated.
Scrape down the sides of the bowl with a spatula to ensure all the ingredients are evenly mixed.
The mixture should look thick, creamy, and chocolatey. Powdered sugar works best because it dissolves smoothly and gives the mousse a soft texture without any graininess.
Step 3: Melt the Chocolate
Place the semi-sweet chocolate in a microwave-safe bowl.
Microwave in 20-second intervals, stirring after each interval, until the chocolate is completely melted and smooth. You can also melt it using a double boiler on the stovetop.
Allow the melted chocolate to cool for approximately 5–10 minutes. It should still be fluid but not hot.
Adding hot chocolate directly to the cream cheese mixture can affect its texture, so make sure it has cooled slightly before proceeding.
Step 4: Incorporate the Melted Chocolate
Pour the cooled melted chocolate into the cream cheese mixture.
Beat on medium speed until the chocolate is completely incorporated and the mixture becomes rich, smooth, and evenly colored.
Scrape down the sides and bottom of the bowl as needed.
At this stage, the chocolate cheesecake base should be thick and creamy, with a deep chocolate aroma.
If the mixture seems exceptionally thick, add 1–2 tablespoons of milk and mix gently until it reaches a smoother consistency.
Step 5: Whip the Heavy Cream
In a separate clean mixing bowl, pour in the cold heavy whipping cream.
Using an electric mixer, beat the cream on medium-high speed until stiff peaks form. This usually takes about 2–4 minutes, depending on your mixer.
When you lift the beaters, the whipped cream should hold its shape without collapsing.
Be careful not to overwhip the cream, as it can become grainy and eventually turn into butter.
Cold cream whips more easily, so keep it refrigerated until you’re ready to use it.
Step 6: Fold the Whipped Cream Into the Chocolate Mixture
Add approximately one-third of the whipped cream to the chocolate cheesecake mixture.
Gently fold it in using a rubber spatula. This first addition helps lighten the thick chocolate base.
Add the remaining whipped cream in two batches, folding gently after each addition.
Use slow, sweeping movements from the bottom of the bowl upward. Avoid vigorous stirring because you want to preserve the air in the whipped cream.
Continue folding until the mixture becomes light, fluffy, and evenly combined.
Your Chocolate Cheesecake Mousse should now have a beautiful, creamy consistency with a rich chocolate color.
Step 7: Fill the Dessert Jars
Prepare 5–6 small mason jars, dessert cups, or serving glasses.
Spoon the mousse into each container, or transfer it to a piping bag for a neater presentation.
Pipe or spoon the mousse evenly into the jars. Gently tap each jar on the countertop to remove any large air pockets.
Smooth the tops with a spoon or spatula if desired.
You can also create layers by adding crushed chocolate cookies to the bottom of each jar before filling them with mousse.
Step 8: Refrigerate Until Set
Cover the jars with lids or plastic wrap and place them in the refrigerator for at least 2–3 hours.
For the best texture and flavor, refrigerate overnight.
Chilling allows the mousse to firm up while the chocolate flavor develops. The finished dessert should be soft, creamy, and spoonable rather than stiff like a baked cheesecake.
Step 9: Add the Toppings
Before serving, decorate each jar with a swirl of whipped cream.
Sprinkle chocolate shavings, mini chocolate chips, or crushed chocolate cookies over the top.
For a little extra indulgence, drizzle chocolate syrup over the mousse. Fresh strawberries or raspberries also pair beautifully with the rich chocolate flavor.
Serve chilled and enjoy every creamy spoonful!
Tips for the Best Chocolate Cheesecake Mousse
-
Use room-temperature cream cheese: This prevents lumps and gives the mousse a smooth consistency.
-
Choose good-quality chocolate: Semi-sweet chocolate provides a balanced flavor without making the dessert overly sweet.
-
Whip the cream properly: Stiff peaks help the mousse hold its shape.
-
Fold gently: Avoid deflating the whipped cream while combining the mixtures.
-
Allow enough chilling time: At least 2–3 hours is recommended for the best texture.
-
Adjust the sweetness: If you prefer a less sweet dessert, use dark chocolate instead of semi-sweet chocolate.
Storage Instructions
Store the mousse covered in the refrigerator for up to 3 days.
Keep it chilled until you’re ready to serve, especially if you’re using whipped cream for decoration.
Freezing is possible, but it may slightly change the creamy texture after thawing. For the best results, enjoy this dessert freshly prepared and refrigerated.
Why You’ll Love This Recipe
This Chocolate Cheesecake Mousse combines everything wonderful about two classic desserts. It has the tangy richness of cheesecake, the airy texture of mousse, and the irresistible flavor of chocolate.
It’s simple enough to make on an ordinary day but elegant enough to serve at special occasions. Individual mason jars make serving easy, and you can prepare them ahead of time without spending hours in the kitchen.
Once you try this creamy, dreamy dessert, it might become one of your favorite chocolate treats!
Would you add chocolate chips or fresh strawberries on top? Let me know in the comments!