
There’s nothing better than the smell of freshly baked homemade bread filling the kitchen. This easy rustic bread has a beautifully crisp, golden crust on the outside and a soft, airy center inside. It looks like something from a bakery, but it’s surprisingly simple to make at home. You don’t need a bread machine or any complicated equipment—just a few basic ingredients, some patience, and a hot oven.
This recipe is perfect for making several beautiful loaves at once. The dough can be prepared ahead of time, making it a great option when you want fresh bread for breakfast, dinner, sandwiches, or a family gathering. Serve it warm with butter, use it for sandwiches, or simply tear off a piece and enjoy it with soup or your favorite meal.
Ingredients
- 4 cups all-purpose flour or bread flour
- 2 teaspoons salt
- 1 teaspoon instant yeast
- 1 ¾ cups warm water
- 1 tablespoon olive oil, optional
- Extra flour, for shaping
- Parchment paper, for baking
Instructions
1. Prepare the Dough
Start by adding the flour, salt, and instant yeast to a large mixing bowl. Whisk or stir the dry ingredients together until the yeast and salt are evenly distributed.
Slowly pour in the warm water while stirring with a wooden spoon or sturdy spatula. Continue mixing until all of the flour is moistened and a rough, sticky dough forms.
If you want a slightly richer flavor and softer texture, you can add a tablespoon of olive oil. However, the bread will still turn out beautifully without it.
The dough should look sticky and somewhat shaggy at this stage. Don’t worry if it doesn’t look smooth. This is a rustic bread, and the long resting time will do most of the work for you.
2. Let the Dough Rise
Cover the bowl tightly with plastic wrap, a lid, or a clean kitchen towel. Place it somewhere warm and allow the dough to rise for about 8 to 12 hours.
Overnight is ideal. The slow fermentation gives the bread a deeper flavor and helps create the beautiful open texture inside.
By the time the dough is ready, it should have doubled in size and look bubbly on the surface. If your kitchen is cool, it may take a little longer.
3. Shape the Loaf
Once the dough has finished its first rise, lightly flour your work surface. Carefully scrape the dough out of the bowl. Try not to handle it too aggressively because you want to keep as much air in the dough as possible.
Lightly flour your hands and gently shape the dough into a round loaf. Fold the edges toward the center and turn the dough over so the smooth side is facing upward.
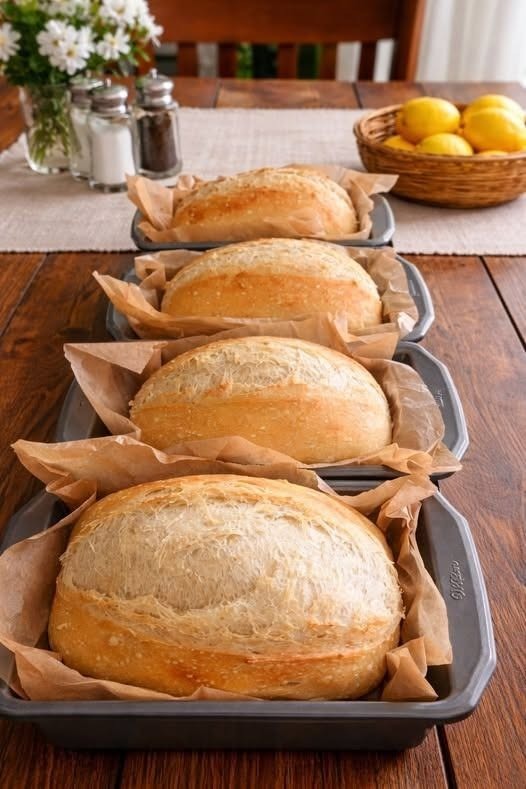
If you want to make several smaller loaves like the ones shown in the photo, divide the dough into 3 or 4 equal portions. Shape each portion gently into a round or oval loaf.
Place each loaf on a piece of parchment paper. Cover loosely with a clean kitchen towel and let them rest for another 30 to 45 minutes.
4. Preheat the Oven
While the dough is resting, preheat your oven to 450°F (230°C).
For the best crust, use a Dutch oven or another heavy oven-safe baking dish with a lid. Place the Dutch oven inside the oven while it preheats. Allow it to heat for at least 30 minutes.
The extremely hot baking surface helps the dough rise quickly when it goes into the oven and creates that beautiful bakery-style crust.
If you’re making multiple loaves, you can bake them one at a time in a Dutch oven or use heavy baking pans if you prefer.
5. Score the Bread
Just before baking, lightly dust the top of the dough with flour. Using a sharp knife or bread lame, carefully make one or two shallow cuts across the top.
Scoring gives the steam somewhere to escape as the bread expands. It also creates that classic rustic homemade bread appearance.
Be careful when handling the hot Dutch oven.
6. Bake
Carefully remove the preheated Dutch oven from the oven. Lift the dough using the parchment paper and place it inside.
Cover with the lid and bake for 25 to 30 minutes.
After that, remove the lid and continue baking for another 10 to 15 minutes, or until the bread is deeply golden brown and the crust looks crisp.
The exact baking time may vary depending on your oven and the size of your loaf.
For smaller loaves, start checking them earlier so they don’t become too dark.
7. Cool Before Slicing
Once the bread is finished, carefully remove it from the Dutch oven and place it on a wire rack.
As tempting as it is to cut into it immediately, allow the bread to cool for at least 30 to 45 minutes.
Cooling gives the interior time to finish setting. If you slice it too soon, the inside can become gummy instead of light and fluffy.
Once cooled, slice it with a serrated bread knife and enjoy.
Helpful Tips for Perfect Homemade Bread
Use the right water temperature: The water should be warm but not hot. Extremely hot water can damage the yeast and prevent the dough from rising properly.
Don’t add too much flour: The dough should be sticky. Adding too much flour can make the finished bread dense and heavy.
Give it plenty of rising time: The long fermentation is one of the secrets to flavorful homemade bread. If you have time, let the dough rise overnight.
Preheat your Dutch oven: A properly heated Dutch oven creates steam and helps produce the crisp crust that makes this bread so delicious.
Don’t skip the cooling period: The bread continues to cook internally after coming out of the oven. Letting it cool helps create the perfect texture.
Store leftovers properly: Once completely cooled, keep the bread in a paper bag or bread box at room temperature for up to 2 days. For longer storage, slice the bread and freeze it in an airtight freezer bag.
Serving Ideas
This homemade crusty bread is incredibly versatile. Serve thick slices with butter and honey for breakfast, or use it alongside soups, stews, pasta, and roasted meats.
It also makes excellent sandwiches. Toast a slice and top it with eggs, avocado, cheese, or your favorite deli meat. For a simple snack, drizzle toasted bread with olive oil and sprinkle it with salt.
You can even turn leftover bread into homemade croutons, breadcrumbs, French toast, or garlic bread.
With its crisp golden crust and soft, chewy center, this rustic homemade bread is the kind of recipe you’ll want to make again and again. Once you see how easy it is to make fresh bakery-style bread at home, you may never want to buy a loaf from the store again.