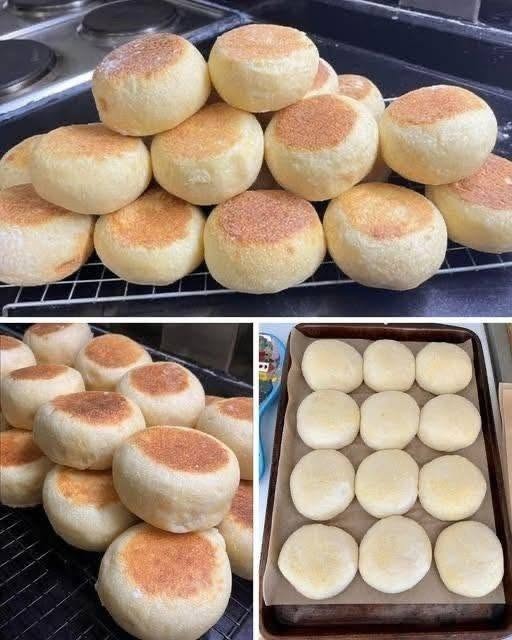

These homemade English muffins are soft, fluffy, lightly crisp on the outside, and filled with beautiful little nooks and crannies inside. They are perfect for breakfast with butter and jam, honey, eggs, cheese, or your favorite breakfast sandwich fillings. Unlike traditional bread, these muffins are cooked on a skillet or griddle, which gives them their signature golden-brown tops and bottoms while keeping the centers soft and tender.
The best part about making English muffins at home is that you don’t need a complicated process. The dough comes together with simple ingredients, and after rising, the muffins are shaped into thick rounds and cooked gently until golden. They make an excellent weekend breakfast and can also be prepared ahead of time and frozen for later.
Ingredients
- 4 cups all-purpose flour
- 2 ¼ teaspoons active dry yeast
- 1 tablespoon granulated sugar
- 1 teaspoon salt
- 1 ¼ cups warm milk
- 2 tablespoons unsalted butter, melted
- 1 large egg
- ½ cup warm water, as needed
- Cornmeal or semolina, for coating
- Butter or a little oil, for cooking
Step 1: Prepare the Yeast
Begin by warming the milk until it is comfortably warm but not hot. Very hot milk can kill the yeast, while milk that is too cool may slow down the rising process.
Pour the warm milk into a large mixing bowl and add the sugar and active dry yeast. Stir gently and let the mixture sit for about 5 to 10 minutes.
The yeast should become slightly foamy on the surface. This is a good indication that the yeast is active and ready to use.
If you are using instant yeast, you can skip the waiting period and mix it directly with the flour.
Step 2: Make the Dough
Add the melted butter and egg to the yeast mixture. Stir until everything is combined.
In a separate bowl, whisk together the flour and salt.
Gradually add the dry ingredients to the wet ingredients, stirring as you go.
The dough will begin to come together and may look slightly sticky. If it feels too dry, add warm water one tablespoon at a time until you have a soft dough.
You want the dough to be soft and slightly tacky but not extremely wet.
Step 3: Knead the Dough
Transfer the dough onto a lightly floured work surface.
Knead the dough for approximately 7 to 10 minutes by hand. Push the dough forward with the heel of your hand, fold it back, rotate it, and repeat.
You are looking for a smooth and elastic dough.
If the dough sticks heavily to your hands or work surface, add a small amount of flour. Avoid adding too much flour because this can make the English muffins dense instead of light and fluffy.
The dough should become smoother and spring back slightly when gently pressed.
Step 4: First Rise
Place the kneaded dough into a lightly greased bowl.
Turn the dough once so that the surface is lightly coated with oil.
Cover the bowl with plastic wrap, a clean kitchen towel, or a lid.
Place the bowl somewhere warm and allow the dough to rise for approximately 1 to 1 ½ hours, or until it has doubled in size.
The exact rising time will depend on the temperature of your kitchen. A warm environment will make the dough rise faster, while a cool kitchen may require more time.
Do not rush this step. Allowing the dough to rise properly helps create soft, airy English muffins.
Step 5: Prepare the Work Surface
Once the dough has doubled in size, lightly flour your work surface.
Gently remove the dough from the bowl.
Do not aggressively punch it down. Instead, gently press out some of the larger air bubbles while keeping as much of the dough’s structure as possible.
Divide the dough into approximately 10 to 12 equal pieces.
For larger English muffins, divide the dough into 8 to 10 pieces.
For smaller breakfast-sized muffins, make 12 pieces.
Step 6: Shape the Muffins
Take one piece of dough and gently shape it into a smooth ball.
Flatten the ball slightly with your palm until it becomes a thick round approximately ½ to ¾ inch thick.
Repeat with the remaining pieces.
The muffins should be fairly thick. They will puff slightly during their second rise and again while cooking.
Sprinkle a baking sheet with cornmeal or semolina.
Place the shaped muffins on the tray, leaving a little space between each one.
Sprinkle the tops lightly with additional cornmeal or semolina.
The cornmeal gives the muffins their traditional slightly textured surface and helps prevent them from sticking.
Step 7: Second Rise
Cover the shaped muffins loosely with a clean kitchen towel.
Allow them to rest for approximately 30 to 45 minutes.
They should become noticeably puffier.
Do not let them rise excessively or they may become difficult to handle.
While the muffins are resting, you can prepare your cooking surface.
Step 8: Heat the Skillet
Use a large heavy-bottomed skillet, cast-iron pan, or griddle.
Place it over medium-low heat.
Lightly grease the pan with butter or a small amount of oil.
The pan should be hot enough to gently brown the muffins but not so hot that the outside burns before the inside cooks.
This is one of the most important parts of the recipe.
English muffins are thicker than pancakes, so they need relatively gentle heat to cook all the way through.
If the pan is too hot, the tops and bottoms will become dark while the centers remain doughy.
Step 9: Cook the English Muffins
Carefully place the risen dough rounds into the skillet.
Leave enough space between them so you can easily flip them.
Cook the muffins for approximately 5 to 7 minutes on the first side.
The bottom should become golden brown.
Gently flip each muffin using a spatula.
Continue cooking the second side for another 5 to 7 minutes.
If they are browning too quickly, reduce the heat to low.
You can also cover the skillet with a lid for part of the cooking time. This helps the heat circulate around the muffins and allows the centers to cook without over-browning the outside.
Depending on their size and thickness, the muffins may need a few additional minutes.
Step 10: Check for Doneness
The English muffins should feel firm but still slightly springy when gently pressed.
The tops and bottoms should be golden brown.
If you are unsure whether the centers are cooked, you can carefully split one muffin open to check.
The inside should be soft, fluffy, and fully cooked rather than wet or sticky.
If the center is still doughy, return the muffins to the skillet over low heat and cook for several more minutes.
Avoid using high heat to speed up the process.
Low and steady heat produces much better English muffins.
Step 11: Cool the Muffins
Transfer the cooked English muffins to a wire rack.
Allow them to cool for at least 10 to 15 minutes before cutting them.
Although it can be tempting to cut into them immediately, allowing them to cool slightly helps the interior finish setting.
For the classic English muffin texture, use a fork to split them rather than cutting them completely through with a knife.
Insert the fork around the edge of the muffin and gently separate the two halves.
This helps preserve the little air pockets inside, creating the famous nooks and crannies that are perfect for holding melted butter, jam, and honey.
How to Serve Homemade English Muffins
There are so many ways to enjoy these homemade English muffins.
For a simple breakfast, split one open and toast it until golden. Spread it generously with butter and add honey or your favorite jam.
Strawberry, raspberry, blueberry, and apricot jam all taste delicious with these muffins.
For a savory option, use them to make breakfast sandwiches.
Add scrambled eggs, cheese, bacon, sausage, ham, or avocado.
You can also make an easy egg and cheese muffin for a quick breakfast before school or work.
For lunch, use toasted English muffin halves as the base for mini pizzas. Add tomato sauce, mozzarella, and your favorite toppings, then toast until the cheese melts.
They can also be served alongside soups and salads.
Tips for Perfect English Muffins
Use the Right Heat
The skillet should be medium-low rather than extremely hot.
English muffins are thick and need enough time to cook through.
If the outside becomes dark very quickly, lower the heat.
Don’t Skip the Second Rise
The second rise helps create lighter and fluffier muffins.
If you cook the dough immediately after shaping, the muffins may be dense.
Don’t Add Too Much Flour
A slightly soft dough produces better English muffins.
Too much flour can make them heavy and dry.
Add flour gradually only when necessary.
Use Cornmeal or Semolina
Coating the muffins with cornmeal or semolina helps prevent sticking and gives them their classic texture.
You only need a light coating.
Cook Slowly
Patience is important.
Cooking the muffins slowly allows the heat to reach the center without burning the exterior.
Storage
Once completely cooled, store the English muffins in an airtight container or resealable bag.
They can remain at room temperature for approximately 2 to 3 days.
For longer storage, refrigerate them.
To serve, split them and toast them until warm and lightly crisp.
Freezing Instructions
These English muffins freeze beautifully.
Allow them to cool completely.
Split them in half and place them in a freezer-safe bag with parchment paper between the pieces if desired.
Freeze for up to 2 to 3 months.
When you’re ready to eat them, place the frozen halves directly into the toaster.
There is no need to thaw them first.
They will become warm and crispy while the center stays soft.
Final Thoughts
Making homemade English muffins is much easier than it might seem. With simple ingredients and a little patience, you can make a batch that is soft, fluffy, golden, and full of those delicious little pockets that catch melted butter and jam.
The key is giving the dough enough time to rise, shaping the rounds gently, and cooking them slowly over medium-low heat. Once you master the basic recipe, you can experiment with different flavors by adding cinnamon and raisins, shredded cheese, herbs, or even a little garlic.
Fresh from the skillet, toasted with butter and topped with jam, these homemade English muffins make an incredible breakfast. They are also perfect for breakfast sandwiches and can easily be frozen so you always have a homemade option ready whenever you need one.