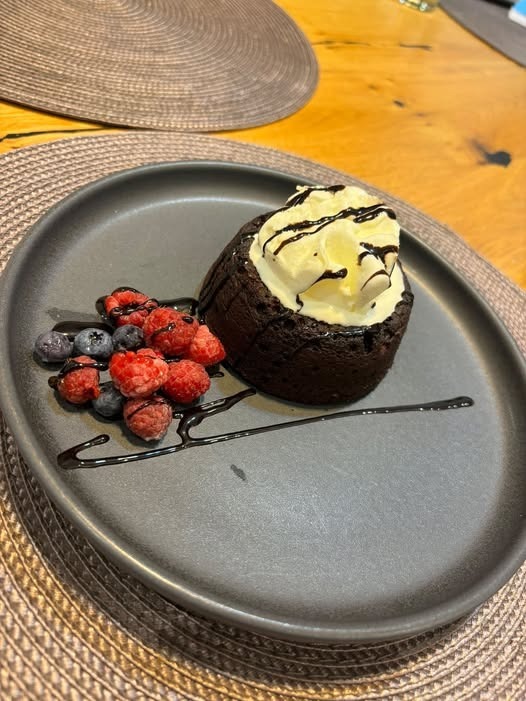

If you are a true chocolate lover, this Homemade Chocolate Lava Cake is the kind of dessert that can turn an ordinary dinner into something special. With a soft, rich chocolate cake on the outside and a warm, gooey chocolate center inside, every bite is wonderfully indulgent. This easy dessert is especially delicious when served warm with a scoop of vanilla ice cream, fresh raspberries, blueberries, and a drizzle of chocolate sauce. The combination of warm chocolate cake and cold creamy ice cream creates an incredible contrast in temperature and texture that makes this dessert hard to resist.
Chocolate lava cake may look like an elegant restaurant dessert, but it is actually quite simple to prepare at home. The ingredients are basic, the preparation takes only a few minutes, and the cakes bake quickly. The most important part of the recipe is making sure you do not overbake the cakes. The outside should be firm enough to hold its shape, while the center remains soft and molten. Once you understand the timing, you can easily make these beautiful individual desserts whenever you have a chocolate craving.
This recipe is perfect for Valentine’s Day, anniversaries, birthdays, dinner parties, date nights, holidays, or any evening when you want an impressive dessert without spending hours in the kitchen.
Why You’ll Love This Chocolate Lava Cake
There are many reasons to keep this recipe in your dessert collection. First, it requires only a handful of ingredients that you may already have in your kitchen. Second, the cakes are prepared and baked individually, making them perfect for serving guests. Most importantly, the texture is incredible. The outside is soft and cake-like, while the middle becomes rich, warm, and chocolatey.
You can also prepare the batter ahead of time and refrigerate the filled ramekins until you’re ready to bake them. This makes the recipe especially convenient when you’re entertaining.
Ingredients
4 ounces high-quality semi-sweet or dark chocolate, chopped
½ cup unsalted butter
½ cup granulated sugar
2 large eggs
2 large egg yolks
1 teaspoon vanilla extract
¼ teaspoon salt
¼ cup all-purpose flour
1 tablespoon unsweetened cocoa powder, plus extra for dusting
Butter and cocoa powder for preparing the ramekins
For serving, vanilla ice cream, fresh raspberries, blueberries, strawberries, powdered sugar, and chocolate syrup are optional but highly recommended.
Kitchen Equipment
4 small oven-safe ramekins
Large mixing bowl
Heatproof bowl
Small saucepan
Whisk
Rubber spatula
Baking tray
Measuring cups and spoons
Preparing the Ramekins
Before preparing the chocolate mixture, preheat your oven to 425°F (220°C). Properly preparing the ramekins is important because it helps the cakes release easily after baking.
Generously butter the inside of four ramekins. Dust each one lightly with cocoa powder and rotate the ramekins so the cocoa coats the bottom and sides. Tap out any excess cocoa powder.
Place the prepared ramekins on a baking tray and set them aside while you prepare the batter.
Melting the Chocolate and Butter
Place the chopped chocolate and butter into a heatproof bowl. Set the bowl over a saucepan containing a small amount of gently simmering water. Make sure the bottom of the bowl does not touch the water.
Stir slowly until the butter and chocolate melt together completely. The mixture should become smooth, glossy, and free of lumps.
Remove the bowl from the heat and allow it to cool for a few minutes. The chocolate should remain warm and fluid but should not be extremely hot.
You can also melt the chocolate and butter in the microwave. Heat them in short 15 to 20-second intervals, stirring between each interval until smooth.
Preparing the Batter
In a separate mixing bowl, whisk together the eggs, egg yolks, and granulated sugar. Continue whisking for about one to two minutes until the mixture becomes smooth and slightly lighter in color.
Add the vanilla extract and salt and mix well.
Slowly pour the melted chocolate and butter mixture into the egg mixture while whisking gently. Continue mixing until everything is completely combined.
Add the all-purpose flour and cocoa powder. Use a rubber spatula or whisk to gently combine the ingredients until you have a smooth chocolate batter. Do not overmix once the flour has been incorporated.
The batter should be thick, glossy, and rich.
Filling the Ramekins
Divide the chocolate batter evenly between the four prepared ramekins. Fill each ramekin approximately three-quarters full, leaving a little space at the top for the cakes to rise during baking.
Place the ramekins on the baking tray and carefully transfer them to the preheated oven.
Baking the Chocolate Lava Cakes
Bake the cakes for approximately 11 to 13 minutes. The exact baking time can vary depending on your oven and the size of your ramekins.
The edges should look firm and set, while the centers should still appear slightly soft. Avoid baking the cakes until the entire surface is completely firm because this can result in an ordinary chocolate cake without the signature molten center.
For an especially gooey center, begin checking the cakes around the 10-minute mark.
Once baked, carefully remove the tray from the oven and allow the cakes to rest for about one minute.
Turning Out the Lava Cakes
Place a serving plate upside down over each ramekin. Carefully flip the plate and ramekin together, then gently lift the ramekin away from the cake.
If you properly buttered and dusted the ramekins, the cakes should release easily.
Be careful when handling the cakes because they will be very hot and delicate.
The moment you cut into the center, warm chocolate should begin flowing from the middle, creating the beautiful molten effect that makes lava cake so special.
How to Serve
For the best experience, serve chocolate lava cake immediately while it is still warm.
Place a scoop of vanilla ice cream directly on top or beside the cake. The cold ice cream slowly melts against the warm chocolate, creating a creamy sauce that pairs beautifully with the rich cake.
Add fresh raspberries and blueberries to the plate for a bright, slightly tart contrast. You can also add strawberries, cherries, or sliced bananas.
Drizzle the plate with chocolate syrup or caramel sauce and finish with a light dusting of powdered sugar.
For an elegant presentation, add a few chocolate curls or finely grated chocolate over the ice cream.
Helpful Tips for Perfect Lava Cakes
Use good-quality chocolate because the chocolate flavor is the star of this dessert. Dark or semi-sweet chocolate works especially well because it provides a rich flavor without making the cakes overly sweet.
Do not overbake the cakes. The center needs to remain soft so that the molten chocolate effect is created.
Make sure your oven is fully preheated before the cakes go inside. A properly heated oven helps the outside set quickly while keeping the center soft.
Butter and cocoa powder the ramekins thoroughly. This makes it much easier to remove the cakes without breaking them.
If you are making the recipe for the first time, consider baking one test cake first. Ovens and ramekin sizes vary, so this can help you determine the exact baking time needed for your preferred center.
Make-Ahead Instructions
Chocolate lava cake can be prepared ahead of time, which makes it perfect for entertaining. Prepare the batter and divide it between the prepared ramekins. Cover them tightly and refrigerate for several hours.
When ready to bake, place the chilled ramekins directly into the preheated oven. You may need to add one or two extra minutes to the baking time because the batter will be cold.
This makes it easy to prepare dessert before your guests arrive and simply bake the cakes when you’re ready to serve them.
Easy Variations
For a mocha lava cake, add ½ teaspoon of instant espresso powder to the melted chocolate. Coffee intensifies the chocolate flavor and gives the dessert a sophisticated taste.
For a peanut butter version, place a small spoonful of creamy peanut butter in the center of each ramekin before baking.
For a salted caramel lava cake, add a teaspoon of thick caramel sauce to the center of each cake and finish with a tiny pinch of flaky sea salt before serving.
You can also add orange zest to the batter for a delicious chocolate-orange combination.
Storage
Chocolate lava cakes are best served immediately, but leftover baked cakes can be refrigerated in airtight containers for up to two days. Keep in mind that reheating may cause the molten center to become firmer.
For the best results, prepare the batter ahead of time rather than baking the cakes in advance.
Frequently Asked Questions
Can I use milk chocolate? Yes, but the finished dessert will be sweeter and milder. Semi-sweet or dark chocolate provides a richer chocolate flavor.
Can I make lava cake without ramekins? Small oven-safe baking dishes or muffin tins can work, although the baking time may need to be adjusted depending on their size.
Why did my lava cake not have a gooey center? The most common reason is overbaking. Reduce the baking time by one or two minutes during your next attempt.
Can I freeze the batter? Yes, prepared unbaked lava cakes can be frozen in suitable freezer-safe ramekins. Allow additional baking time when baking from frozen, and make sure the ramekins are suitable for the temperature change.
Final Thoughts
This Homemade Chocolate Lava Cake is a simple yet impressive dessert that brings restaurant-style chocolate indulgence straight to your kitchen. The rich chocolate cake, warm molten center, creamy vanilla ice cream, fresh berries, and chocolate drizzle create a dessert that looks beautiful and tastes even better. With only a few basic ingredients and a short baking time, you can prepare these individual cakes for a romantic dinner, family celebration, holiday gathering, or a simple weekend treat. The key is to watch the baking time carefully and remove the cakes while the edges are set but the centers are still soft. Serve them immediately with your favorite toppings, break into the warm center, and enjoy every delicious spoonful of this irresistible chocolate dessert.