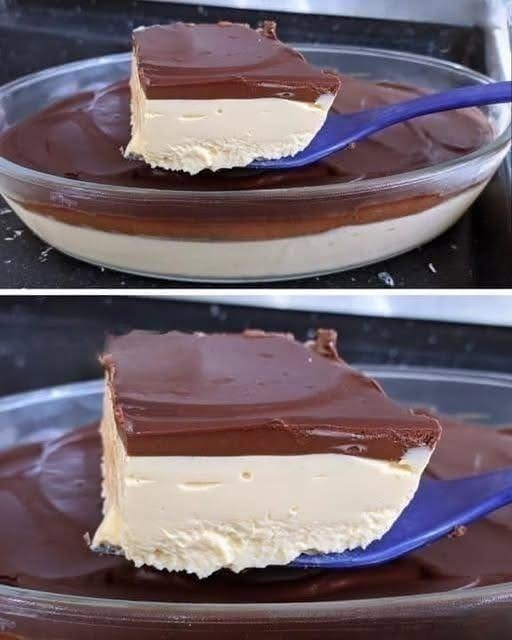

This easy chocolate cream dessert is a rich, smooth, and indulgent treat that comes together without requiring an oven. It features a creamy, melt-in-your-mouth vanilla layer topped with a glossy layer of chocolate, creating the perfect combination of light creaminess and deep chocolate flavor. The contrasting layers make this dessert look elegant while the simple preparation makes it ideal for busy days, family gatherings, dinner parties, or whenever you want a delicious homemade dessert without complicated baking.
Ingredients
For the creamy bottom layer, you will need 8 ounces cream cheese softened to room temperature, 1 cup heavy whipping cream, ½ cup powdered sugar, 1 teaspoon vanilla extract, and 1 cup finely crushed vanilla cookies or graham crackers. You will also need 3 tablespoons melted butter to help bind the cookie crumbs together.
For the chocolate topping, prepare 1 cup semi-sweet chocolate chips, ½ cup heavy cream, 1 tablespoon unsalted butter, and 1 teaspoon vanilla extract. A small pinch of salt can also be added to enhance the chocolate flavor.
Prepare the Cookie Base
Begin by crushing the vanilla cookies or graham crackers until they resemble fine crumbs. You can use a food processor or place the cookies in a sealed bag and crush them with a rolling pin.
Transfer the crumbs to a bowl and add the melted butter. Mix thoroughly until all the crumbs are evenly coated and the mixture resembles wet sand.
Press the mixture firmly into the bottom of an 8-inch or 9-inch round baking dish. Use the bottom of a glass or measuring cup to create an even, compact layer.
Place the dish in the refrigerator while preparing the creamy filling. Chilling the base helps it become firm and makes it easier to add the next layer.
Make the Creamy Filling
Place the softened cream cheese in a large mixing bowl and beat it until completely smooth. Add the powdered sugar and vanilla extract and continue mixing until the mixture becomes creamy and lump-free.
In a separate bowl, whip the heavy cream until stiff peaks form. The whipped cream should be thick enough to hold its shape but should not be overwhipped.
Gently fold the whipped cream into the cream cheese mixture using a rubber spatula. Fold slowly and carefully to maintain as much air as possible. This creates a light and fluffy filling rather than a dense one.
Taste the filling and add a little more powdered sugar if you prefer a sweeter dessert.
Add the Cream Layer
Remove the chilled cookie base from the refrigerator. Spoon the cream cheese mixture over the crust and spread it evenly using a spatula.
Smooth the surface as much as possible because the chocolate layer will be added on top. Once the creamy layer is even, place the dish back in the refrigerator while you prepare the chocolate topping.
Allowing the cream layer to chill for at least 20 to 30 minutes helps it firm up and prevents the chocolate topping from mixing into the creamy layer.
Prepare the Chocolate Topping
Place the chocolate chips in a heatproof bowl. Heat the heavy cream in a small saucepan over medium-low heat until it is hot and begins to steam. Do not bring it to a rolling boil.
Pour the hot cream over the chocolate chips and let the mixture sit undisturbed for approximately 2 minutes. This allows the chocolate to soften.
Add the butter and vanilla extract, then gently whisk until the chocolate melts completely and the mixture becomes smooth, glossy, and silky.
If small pieces of chocolate remain, place the bowl over a saucepan of gently simmering water and stir carefully until everything melts. Avoid getting water into the chocolate because even a small amount can cause it to seize.
Allow the chocolate mixture to cool for several minutes. It should still be pourable but should not be hot.
Add the Chocolate Layer
Remove the chilled dessert from the refrigerator. Slowly pour the chocolate mixture over the creamy layer.
Use a spatula to gently spread the chocolate evenly across the top. Try not to press too hard because you want to keep the layers distinct and smooth.
For a perfectly glossy finish, gently shake the dish from side to side to help the chocolate settle into an even layer.
Chill the Dessert
Cover the dish with plastic wrap or foil and refrigerate for at least 4 hours. For the best results, refrigerate it overnight.
The longer chilling time allows the creamy layer to become firm enough to slice while the chocolate topping sets into a smooth, rich layer.
If you’re serving the dessert for a special occasion, making it the night before is an excellent option because it gives the dessert plenty of time to set and allows the flavors to develop.
How to Serve
Once fully chilled, use a sharp knife to cut the dessert into slices. For cleaner cuts, dip the knife into hot water, wipe it dry, and then slice. Repeat between cuts.
Serve each slice chilled. The creamy bottom layer should be soft and smooth while the chocolate topping should have a slightly firmer, fudgy texture.
You can decorate individual servings with whipped cream, chocolate shavings, cocoa powder, chopped nuts, fresh berries, or a small drizzle of chocolate sauce.
Tips for the Best Results
Make sure the cream cheese is completely softened before mixing. Cold cream cheese can leave small lumps in the filling.
Use cold heavy cream when whipping it. Cold cream generally whips more quickly and holds its shape better.
Do not overmix the whipped cream into the cream cheese mixture. Gentle folding helps maintain the airy texture.
Allow the chocolate topping to cool slightly before pouring it over the cream layer. If the chocolate is too hot, it can soften or melt the creamy layer.
Give the dessert plenty of time to chill. Although it may look set after a couple of hours, at least 4 hours is recommended for a firm, sliceable dessert.
For the cleanest slices, use a warm knife and wipe it clean after each cut.
Flavor Variations
You can easily customize this dessert with different flavors. For a chocolate cookie base, replace the vanilla cookies with chocolate sandwich cookies or chocolate graham crackers.
For a peanut butter version, add ½ cup creamy peanut butter to the cream cheese mixture. The combination of peanut butter and chocolate creates a rich dessert similar to a classic peanut butter cup.
For a coffee-inspired version, dissolve 1 teaspoon of instant espresso powder in the warm cream before adding it to the chocolate. This gives the chocolate topping a deeper and more intense flavor.
For a mint chocolate variation, add a small amount of peppermint extract to the creamy layer and use dark chocolate for the topping.
You can also add chopped toasted pecans, walnuts, or almonds between the creamy and chocolate layers for extra crunch.
Storage
Keep the finished dessert covered and refrigerated. It should stay fresh for approximately 3 to 4 days when properly stored.
Because this dessert contains cream cheese and whipped cream, it should remain refrigerated until you’re ready to serve it. Avoid leaving it at room temperature for extended periods.
You can also freeze individual slices. Wrap each slice tightly in plastic wrap and place it inside a freezer-safe container. Freeze for up to 1 month. Thaw the slices in the refrigerator before serving.
Final Thoughts
This chocolate cream dessert is a wonderful choice when you want something rich, creamy, and impressive without spending hours in the kitchen. The buttery cookie base provides a delicious foundation, the smooth cream cheese filling adds a light and creamy texture, and the glossy chocolate topping brings everything together with a deep chocolate flavor.
The beautiful layers make it perfect for serving at family dinners, holidays, birthdays, potlucks, and special celebrations. At the same time, the simple no-bake preparation means you can easily make it ahead of time and let it chill until you’re ready to serve.
Every bite combines creamy vanilla, buttery cookie crumbs, and silky chocolate for a dessert that is incredibly satisfying. Once you try this recipe, it is sure to become one of those easy homemade desserts you’ll want to make again and again.