
A Complete Meal in a Jar for Easy Future Dinners!
If you love having homemade meals ready to go, these Chicken Fajitas in a Jar are such a clever idea! Everything is prepared ahead of time and packed into jars, so when you need a quick meal, you already have the main ingredients ready. Tender chicken, colorful bell peppers, onions, and fajita seasonings come together to create a flavorful meal that can be served with tortillas, rice, or your favorite toppings.
This is especially useful for busy days when you don’t want to spend a lot of time preparing dinner. Instead of chopping chicken and vegetables every time you want fajitas, you can prepare your jars ahead of time and have a convenient homemade meal waiting in the pantry.
Important: Because chicken is a low-acid food, it must be pressure canned using a tested process for safe shelf storage. The National Center for Home Food Preservation recommends 75 minutes for boneless chicken in pint jars and 90 minutes for quart jars, with pressure adjusted according to altitude and canner type. The exact combination of chicken, peppers, onions, and fajita seasoning shown here is not itself a tested NCHFP canning recipe, so the safest approach is to use a tested chicken-canning process and not assume that any homemade “meal-in-a-jar” combination is automatically shelf-safe.
Ingredients
For a simple fajita-style meal, you can prepare boneless, skinless chicken breasts or thighs, sliced into manageable pieces. You will also need bell peppers in several colors, such as red, yellow, orange, and green, along with onions.
For seasoning, use a fajita-style blend containing chili powder, cumin, paprika, garlic powder, onion powder, oregano, black pepper, and salt.
Fresh garlic can also be used for additional flavor.
The colorful peppers are what make these jars look so beautiful. Red, yellow, orange, and green peppers create a bright combination that looks wonderful when layered inside the jars.
Preparing the Chicken
Begin with fresh, chilled boneless chicken. Trim away excess fat and remove any skin or bones.
Cut the chicken into strips or chunks. Try to keep the pieces relatively similar in size so they cook evenly.
For safe canning, follow a tested pressure-canning recipe for chicken rather than inventing your own processing time. NCHFP’s tested chicken process allows raw or hot pack for boneless chicken, with the recommended headspace and processing times specified in its chicken guide.
Preparing the Vegetables
Wash the bell peppers thoroughly and remove the stems and seeds.
Cut the peppers into strips or pieces. You can use a mixture of red, yellow, orange, and green peppers to create that classic fajita appearance.
Peel the onions and cut them into strips.
Keep the vegetables relatively uniform in size. This makes the jars easier to pack and gives you attractive layers.
You can also add garlic for extra flavor.
Preparing the Fajita Seasoning
In a small bowl, combine your favorite fajita spices.
A simple homemade combination includes chili powder, ground cumin, paprika, garlic powder, onion powder, dried oregano, black pepper, and salt.
Mix everything thoroughly.
The seasoning can be adjusted according to your family’s taste. If you like spicy fajitas, add a little cayenne pepper or chili powder. For a milder version, reduce the amount of chili seasoning.
Keep in mind that seasoning amounts and ingredients can affect the safety of a canning recipe, so for shelf-stable canning, use a tested recipe’s specified ingredients and quantities rather than freely modifying an established canning formula.
Packing the Jars
This is where these jars become especially beautiful.
Place the prepared chicken pieces into clean jars according to the tested chicken-canning method you are following. Add the vegetables and seasonings in the amounts specified by that tested recipe.
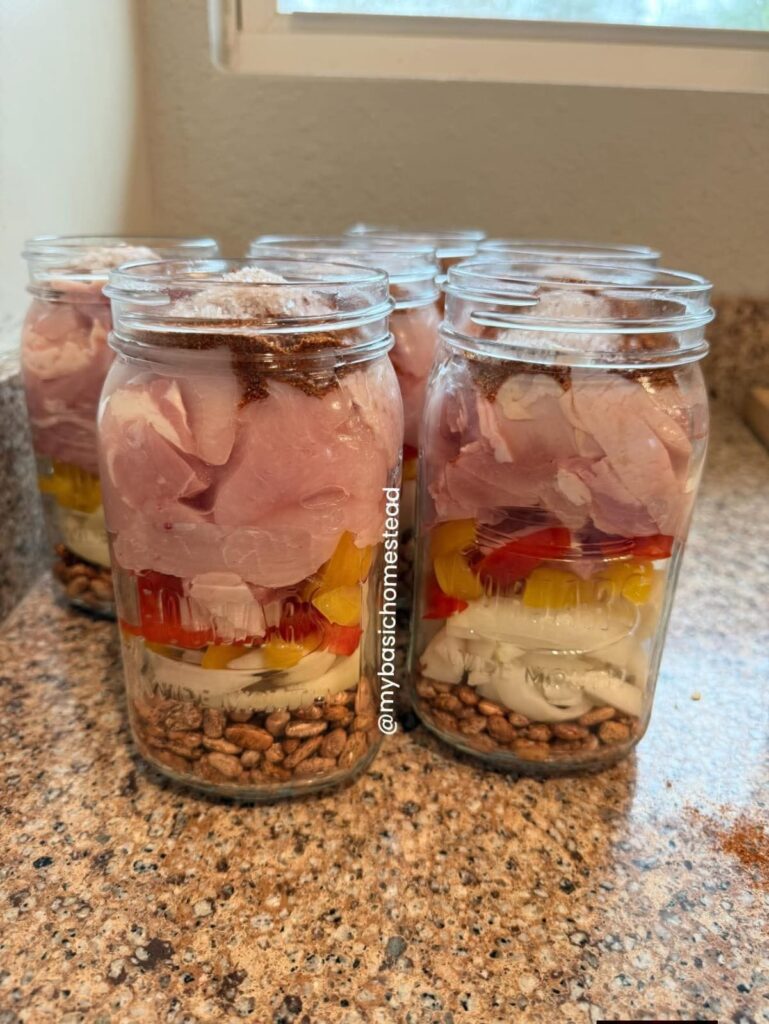
The jars shown in the picture have beautiful layers of chicken, onions, and colorful peppers. That makes them look almost like a complete fajita dinner right inside the jar!
Do not pack the jars tightly. Proper space is necessary for heat to circulate during pressure processing.
Also, don’t add extra liquid simply because the jar looks dry. For plain raw-packed boneless chicken, the NCHFP procedure specifically says not to add liquid and calls for 1¼ inches of headspace.
Pressure Canning
Chicken is a low-acid food, so pressure canning is required for shelf-stable storage. A boiling-water bath is not a safe substitute.
For plain boneless chicken, NCHFP’s tested process is 75 minutes for pint jars or 90 minutes for quart jars. Pressure requirements depend on whether you are using a dial-gauge or weighted-gauge canner and on your altitude.
For example, with a weighted-gauge pressure canner, the NCHFP chicken table specifies 10 PSI at 0–1,000 feet and 15 PSI above 1,000 feet for boneless chicken. A dial-gauge canner uses different pressure adjustments based on altitude.
Because the pictured recipe contains chicken plus vegetables and fajita seasoning, don’t assume the plain-chicken processing schedule automatically validates this exact combination. For actual shelf-stable canning, use a tested recipe specifically designed for the ingredients and jar configuration.
Cooling the Jars
Once the correct tested pressure-canning process is complete, allow the canner to depressurize naturally.
Do not force-cool the canner with cold water or open the vent before the pressure has completely returned to zero. Forced cooling can cause liquid loss and seal failures.
After the canner has depressurized, follow the manufacturer’s instructions for opening it safely. Remove the jars using a jar lifter and place them upright on a towel.
Leave space between the jars and allow them to cool undisturbed for 12 to 24 hours.
After cooling, check each seal before storing.
Turning Your Jar Into Dinner
When you’re ready for fajitas, open the jar and follow the reheating instructions associated with your tested canning recipe.
Warm the chicken and vegetables thoroughly in a saucepan or skillet.
Serve the mixture inside warm flour or corn tortillas.
Add your favorite toppings, such as shredded cheese, sour cream, salsa, avocado, cilantro, or fresh lime juice.
You can also serve the chicken fajita mixture over cooked rice for a delicious fajita rice bowl.
Another option is to serve it with beans, lettuce, tomatoes, or guacamole for a complete family meal.
Why This Is So Convenient
The biggest advantage of meal preparation like this is convenience.
Imagine coming home after a long day and already having your chicken and vegetables prepared. Instead of washing vegetables, cutting chicken, seasoning everything, and cooking from scratch, you have most of the work done.
It can also be useful for busy families, camping trips where appropriate food-storage rules are followed, emergency pantry planning, or simply keeping homemade meals available.
And because the jars are individually portioned, you can prepare only what you need for dinner.
Final Thoughts
These Chicken Fajita Jars are such a fun meal-prep idea! 🍗🌶️🧅 The colorful peppers, onions, chicken, and fajita flavors make them look beautiful while offering the convenience of having ingredients ready for a quick dinner.
The key thing to remember is that the picture’s “complete meal in a jar” concept should not be treated as a tested canning recipe simply because the ingredients look suitable together. For shelf-stable storage, chicken requires pressure canning, and the exact recipe and process must be tested for safety. The NCHFP specifically provides tested processing guidance for chicken and emphasizes following the correct time, pressure, and altitude adjustments.
Once you have a properly tested version, though, the idea is fantastic for busy days!
Would you make Chicken Fajitas in a Jar? 🌮🍗🌶️ Imagine opening a jar and having most of dinner ready to go! Tell me in the comments if you would serve yours with tortillas, rice, cheese, or guacamole. ❤️