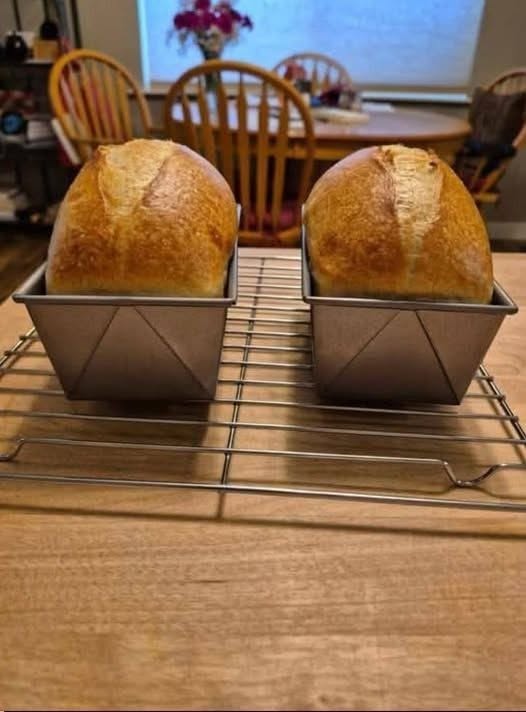

This homemade sourdough sandwich bread is soft, flavorful, beautifully golden on the outside, and tender enough for everyday sandwiches, toast, French toast, or simply spreading with butter. The loaves in the picture have a gorgeous rustic crust while still having a soft, satisfying crumb inside. The best part is that this recipe is simple and does not require complicated techniques or constant stretching and folding.
Ingredients
For 2 sandwich loaves:
- 200 g active sourdough starter
- 700 g bread flour
- 350 g warm water
- 150 g whole milk
- 40 g honey or granulated sugar
- 40 g unsalted butter, softened
- 12 g salt
- 1 tablespoon olive oil or vegetable oil, optional
Make sure your sourdough starter is active and bubbly before beginning. A healthy starter should have risen noticeably after feeding and should smell pleasantly tangy rather than strongly acidic.
Step 1: Prepare the Dough
In a large mixing bowl, combine the active sourdough starter, warm water, and milk. Stir until the starter is mostly dissolved into the liquids.
Add the honey or sugar and mix well. The sweetener adds a subtle flavor and helps give the finished bread a beautiful golden crust.
Gradually add the bread flour. Mix with a wooden spoon, sturdy spatula, or your hands until all the flour is incorporated and there are no obvious dry patches remaining.
The dough will look rough and slightly sticky at this stage. That is completely normal. Cover the bowl and allow the dough to rest for about 20 to 30 minutes.
Step 2: Add the Butter and Salt
After the short rest, add the salt and softened butter.
Work the butter into the dough using your hands. At first, the dough may feel greasy and messy, but continue mixing until the butter is completely incorporated.
Knead the dough gently for several minutes until it begins to feel smoother and more elastic. You do not need to perform repeated stretching and folding throughout the entire process. The goal is simply to develop enough gluten for the dough to hold its shape.
If the dough feels extremely sticky, resist the temptation to add lots of extra flour. Slightly sticky dough usually produces a softer loaf.
Step 3: First Rise
Lightly grease a clean bowl and place the dough inside. Cover it with plastic wrap, a lid, or a clean kitchen towel.
Allow the dough to rise at room temperature until it becomes noticeably puffy and increases in size.
Depending on the temperature of your kitchen and the strength of your sourdough starter, this can take approximately 4 to 8 hours. Sourdough timing can vary significantly, so watch the dough rather than relying only on the clock.
The dough does not necessarily have to double completely. Look for a soft, airy appearance with some visible bubbles around the edges.
If your kitchen is cool, the dough may need more time. If your kitchen is warm, fermentation can happen much faster.
Step 4: Divide the Dough
Once the first rise is complete, gently transfer the dough onto a lightly floured work surface.
Divide the dough into two equal portions.
Try not to aggressively punch all of the air out. Handle the dough gently so you preserve some of the fermentation that has developed.
Take one portion and gently flatten it into a rough rectangle. Fold the sides toward the center and then roll the dough tightly into a loaf.
Pinch the seam closed underneath.
Repeat with the second portion.
Step 5: Prepare the Loaf Pans
Grease two standard loaf pans with butter or a little oil.
Place each shaped loaf into its prepared pan with the seam facing downward.
The dough should sit comfortably inside the pans and have enough room to rise.
Cover both pans loosely and allow the dough to rise again at room temperature.
Step 6: Second Rise
The second rise is very important because it helps create the light and soft texture you want in sandwich bread.
Allow the loaves to rise until they look noticeably puffy and have risen above or close to the rim of the loaf pans.
Depending on your starter and room temperature, this may take approximately 2 to 5 hours.
Avoid rushing this stage. If the dough is under-proofed, the finished bread can be dense and may split dramatically during baking. If it is allowed to ferment for too long, it can become weak and collapse.
A gentle finger test can help. Lightly press the surface of the dough with a fingertip. If the indentation slowly springs back, the dough is generally ready for baking.
Step 7: Bake the Bread
Preheat your oven to 375°F (190°C).
For an especially beautiful crust, you can lightly brush the tops of the loaves with milk or melted butter before baking. You can also leave them plain for a more rustic appearance like the loaves shown in the picture.
Place the loaf pans on the center rack of the preheated oven.
Bake for approximately 35 to 45 minutes, or until the loaves are deeply golden brown and sound hollow when gently tapped.
If the tops begin browning too quickly, loosely cover them with aluminum foil for the remaining baking time.
For the most accurate result, the internal temperature should be around 190–200°F (88–93°C).
Step 8: Cool Completely
Remove the bread from the oven and allow it to cool in the pans for about 10 minutes.
Then carefully remove the loaves from the pans and place them on a wire cooling rack.
Allow them to cool completely before slicing.
I know it is tempting to cut into a fresh loaf immediately, but letting the bread cool allows the interior to finish setting. Cutting too early can make the crumb appear gummy.
Once completely cool, use a sharp bread knife to slice the loaves.
Storage
Store the cooled bread in an airtight container or bread bag at room temperature for approximately 3 to 4 days.
For longer storage, slice the bread and freeze it in a freezer-safe bag. Individual slices can be removed as needed and toasted directly from frozen.
You can also freeze an entire cooled loaf for longer storage.
Tips for Perfect Sourdough Sandwich Bread
Use an active starter for the best rise. If your starter has been sitting in the refrigerator for a long time, feed it before making the dough and wait until it becomes active and bubbly.
Do not add excessive flour during mixing. A slightly soft dough generally produces a softer sandwich loaf.
Pay attention to fermentation rather than following the clock exactly. Sourdough is affected by starter strength, room temperature, flour, and hydration.
For a softer crust, brush the freshly baked loaves with a little melted butter immediately after removing them from the oven.
For a slightly richer loaf, you can replace some of the milk with additional whole milk or add a little extra butter.
This homemade sourdough sandwich bread is perfect for breakfast toast, grilled cheese, sandwiches, French toast, or simply enjoying warm with butter. Once you make it at home, you may find yourself keeping a loaf ready in the kitchen all the time.