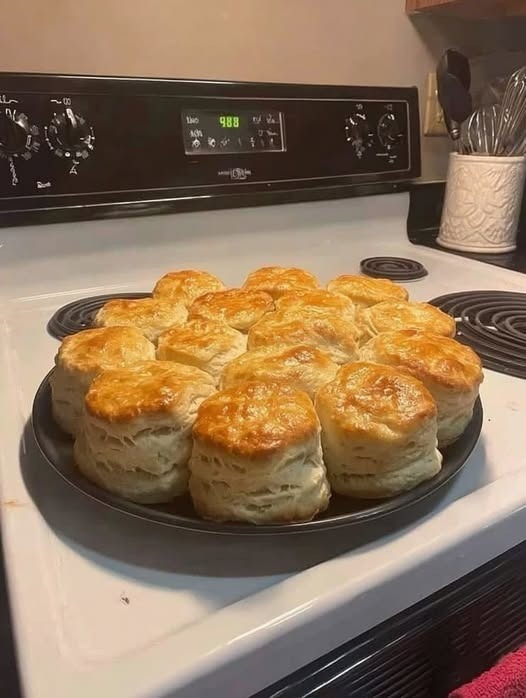

These homemade flaky buttermilk biscuits are everything you want in a classic Southern-style biscuit: golden and slightly crisp on the outside, incredibly soft and tender in the middle, buttery throughout, and packed with delicate flaky layers. They are perfect for breakfast, brunch, dinner, or whenever you are craving something warm and homemade. The biscuits in the photo have that beautiful golden-brown finish and tall, layered texture that makes them especially inviting.
Making biscuits from scratch may seem intimidating at first, but the process is actually quite simple. The most important things to remember are to use cold butter, cold buttermilk, avoid overmixing the dough, and handle the dough gently. These small details make a huge difference in the final texture.
This recipe makes approximately 12 to 16 biscuits depending on the size of your biscuit cutter.
Ingredients
For the biscuits:
- 4 cups all-purpose flour
- 1 tablespoon baking powder
- 1 teaspoon baking soda
- 1 tablespoon granulated sugar
- 1 ½ teaspoons salt
- 1 cup unsalted butter, very cold
- 1 ¾ cups cold buttermilk
- 2 tablespoons melted butter, for brushing
- Additional flour for the work surface
For an optional richer finish:
- 1 tablespoon heavy cream or buttermilk for brushing the tops
- A small pinch of flaky salt for sprinkling
Why These Biscuits Turn Out So Flaky
Before getting into the instructions, it helps to understand what makes homemade biscuits different from ordinary bread. Biscuits are not supposed to have the chewy texture of yeast bread. Instead, they should be tender, light, and layered.
The butter is one of the most important ingredients. When cold pieces of butter are distributed throughout the dough and the biscuits go into a hot oven, the butter melts and releases steam. That steam creates little pockets between the layers of dough. The result is a biscuit that pulls apart easily and has those beautiful flaky layers.
The buttermilk also plays an important role. It adds moisture while providing a slight tangy flavor that balances the richness of the butter. The acidity in buttermilk also works with the baking soda to help the biscuits rise.
For this reason, avoid substituting warm milk and soft butter if you want the same flaky texture. The colder your butter and buttermilk are, the better.
Step 1: Prepare the Oven
Begin by preheating your oven to 425°F (220°C). Let the oven heat completely before putting the biscuits inside.
A hot oven is essential because biscuits need a quick burst of heat to rise properly. If the oven is still warming up when the biscuits go inside, the butter may melt before the dough has a chance to rise, which can result in flatter biscuits.
Prepare a large baking sheet, round baking pan, or cast-iron skillet. You can lightly grease the pan or line it with parchment paper.
If you want biscuits with soft sides, place them close together so they are almost touching. If you prefer crispier sides, leave a little space between each biscuit.
Step 2: Mix the Dry Ingredients
In a large mixing bowl, add the all-purpose flour, baking powder, baking soda, sugar, and salt.
Whisk everything together thoroughly.
The baking powder and baking soda are responsible for helping the biscuits rise. The sugar adds a very subtle sweetness and also helps the tops develop a beautiful golden color. The salt balances all of the flavors and keeps the biscuits from tasting flat.
Make sure the ingredients are evenly distributed before adding the butter.
Step 3: Add the Cold Butter
Take your very cold butter and cut it into small cubes.
Add the butter to the flour mixture.
Using a pastry cutter, fork, or your fingertips, gently work the butter into the flour. Stop when the mixture resembles coarse crumbs with some larger pieces of butter still visible.
You do not want the butter completely blended into the flour.
Some pieces should be about the size of small peas, while others can be slightly larger. These pieces will create the flaky layers during baking.
If you are using your hands, work quickly. The heat from your hands can soften the butter. If you notice that the butter is becoming soft or greasy, place the bowl in the refrigerator for 10 to 15 minutes before continuing.
This is one of the easiest ways to improve your biscuit texture.
Step 4: Add the Buttermilk
Make a small well in the center of the flour mixture.
Pour in the cold buttermilk gradually.
Using a wooden spoon or rubber spatula, gently stir everything together.
Do not vigorously mix the dough.
At first, the mixture may look dry and crumbly. Continue gently folding until most of the flour has been incorporated.
The dough should look slightly rough and somewhat sticky. That is exactly what you want.
Avoid adding extra flour just because the dough looks sticky. Too much flour can make the biscuits heavy and dry.
If the dough seems extremely dry and refuses to come together, add another tablespoon of buttermilk at a time until it reaches the correct consistency.
Step 5: Transfer the Dough
Lightly flour your work surface.
Turn the dough onto the surface.
Sprinkle just a little flour over the top.
Do not knead the dough like you would knead bread. Biscuit dough requires gentle handling.
Use your hands to gently press the dough into a rectangle approximately ¾ to 1 inch thick.
At this stage, the dough may still look uneven. That is perfectly fine.
The goal is not to make it perfectly smooth.
Step 6: Create the Flaky Layers
This is the special step that helps create those beautiful layers.
Take one side of the dough and fold it toward the center. Then fold the opposite side over it, similar to folding a letter.
Gently press the dough down again.
Repeat this folding process two or three times.
Do not press too aggressively.
Every fold creates another layer of butter and dough. When the biscuits bake, those layers separate and create the flaky texture you see in the finished biscuits.
If your kitchen is warm, you can place the dough in the refrigerator for about 10 minutes between folds.
Step 7: Cut the Biscuits
After the final fold, gently press the dough until it is about 1 inch thick.
Use a round biscuit cutter to cut the biscuits.
Press the cutter straight down and lift it straight back up.
Do not twist the cutter.
Twisting can compress the edges of the dough and make it harder for the biscuits to rise properly.
Place the biscuits onto your prepared baking pan.
For soft-sided biscuits, arrange them close together. For biscuits with more golden edges, leave a little space between them.
When you have cut as many biscuits as possible, gather the remaining dough.
Very gently bring the scraps together and press them out again.
Try not to repeatedly knead and reshape the scraps because the more you work the dough, the tougher the biscuits can become.
Step 8: Chill the Biscuits
For extra flaky biscuits, place the entire baking pan in the refrigerator for approximately 10 to 15 minutes.
This step is optional but highly recommended.
Chilling the biscuits makes sure the butter is very cold before they enter the hot oven.
You can also prepare the biscuits ahead of time and refrigerate them until you are ready to bake.
Step 9: Brush the Tops
Before baking, brush the tops of the biscuits with melted butter.
You can also brush them with a little buttermilk or heavy cream.
This helps create the beautiful golden-brown surface.
If you want a slightly more savory finish, sprinkle a very small amount of flaky salt over the tops.
Be careful not to add too much salt because the dough already contains salt.
Step 10: Bake
Place the biscuits into the fully preheated 425°F (220°C) oven.
Bake for approximately 15 to 20 minutes.
The exact baking time will depend on the size and thickness of your biscuits.
Watch for the tops to become golden brown and the biscuits to rise noticeably.
The edges should look cooked and lightly browned, while the tops should have a beautiful golden color.
If you have made smaller biscuits, they may be ready closer to 12 to 15 minutes.
Larger biscuits may require closer to 20 minutes.
Try not to open the oven repeatedly while they are baking because this can cause the temperature to drop.
Step 11: Finish With Butter
As soon as the biscuits come out of the oven, brush the tops with another little bit of melted butter.
This gives them a wonderful buttery flavor and makes the tops glossy and golden.
Let them rest for approximately 5 minutes before serving.
They are especially delicious while warm.
How to Serve Homemade Biscuits
There are countless ways to serve these biscuits.
For a simple breakfast, split a warm biscuit in half and spread it with butter and honey.
You can also serve them with strawberry, raspberry, blueberry, or peach jam.
For a savory breakfast, use the biscuits to make breakfast sandwiches with eggs, cheese, bacon, sausage, or ham.
They are also excellent with sausage gravy. Simply split a warm biscuit and spoon hot sausage gravy over the top.
For dinner, serve them alongside fried chicken, roasted chicken, turkey, mashed potatoes, vegetables, soups, or hearty stews.
You can even use them as a base for mini sandwiches when serving guests.
Tips for Making the Best Biscuits
Keep Everything Cold
Cold butter is probably the most important detail.
If the butter becomes soft while you are working with the dough, place the dough in the refrigerator.
Cold buttermilk is also helpful.
Don’t Overmix
Once you add the buttermilk, mix only until the dough comes together.
A few dry or rough-looking areas are okay.
Overmixing develops gluten, which can make the biscuits chewy and tough.
Don’t Use Too Much Flour
It can be tempting to keep adding flour because the dough is sticky.
Try to resist.
A slightly sticky dough produces much softer biscuits.
Use only enough flour to prevent the dough from sticking excessively to your work surface and hands.
Don’t Twist the Cutter
Always press the biscuit cutter straight down.
Twisting can seal the edges and interfere with the biscuit’s ability to rise.
Use a Sharp Cutter
A sharp biscuit cutter creates clean edges.
If your cutter is dull, the dough can be compressed rather than cleanly cut.
How to Store Leftover Biscuits
These biscuits are best when served fresh and warm, but leftovers can be stored.
Allow the biscuits to cool completely.
Place them in an airtight container or resealable bag and keep them at room temperature for up to two days.
To warm them, place them in a 300°F (150°C) oven for several minutes.
You can also warm individual biscuits in the microwave for a short period, although the oven will give them a better texture.
How to Freeze Biscuits
You can also freeze the biscuits before baking.
After cutting the dough, place the unbaked biscuits on a parchment-lined tray.
Freeze them until solid.
Then transfer them to a freezer-safe bag or airtight container.
When you want fresh biscuits, place the frozen biscuits directly on a baking sheet.
You do not necessarily need to thaw them first.
Bake at 425°F (220°C), adding several extra minutes to the baking time.
This is a great way to have homemade biscuits ready whenever you need them.
Common Problems and How to Fix Them
If your biscuits turn out flat, the butter may have been too warm, the dough may have been overworked, or your baking powder may not be fresh.
If your biscuits are tough, the dough was probably mixed or kneaded too much, or too much flour was added.
If the biscuits are dry, there may not have been enough buttermilk or the dough may have been overbaked.
If the tops are pale, your oven may not have been hot enough or the biscuits may need a few additional minutes of baking.
If the biscuits spread instead of rising, try chilling them before baking and make sure your baking powder and baking soda are still active.
Make-Ahead Instructions
These biscuits are perfect for preparing ahead.
You can make the dough, cut the biscuits, and place them on a baking tray.
Cover the tray tightly and refrigerate the biscuits until you are ready to bake.
When you are ready, simply brush the tops and bake them in a fully preheated oven.
You can also freeze the unbaked biscuits for longer storage.
This makes them convenient for busy mornings, holidays, family breakfasts, and weekend brunches.
Final Thoughts
Homemade flaky buttermilk biscuits are one of those recipes that become easier every time you make them. Once you understand the importance of cold butter, gentle handling, and a hot oven, you can consistently create biscuits that are beautifully golden on the outside and soft, buttery, and flaky inside.
They are simple enough for an ordinary breakfast but impressive enough to serve to family and guests. The combination of crisp golden tops, tender centers, and delicate layers makes these biscuits incredibly satisfying straight from the oven.
Serve them warm with butter and honey for something sweet, pair them with eggs and sausage for breakfast, or serve them alongside a comforting dinner. However you enjoy them, these homemade biscuits are best when they are fresh, warm, and generously brushed with butter.