
This homemade ice cream is creamy, smooth, and incredibly easy to make. It is a great option when you want a sweet frozen treat without making a complicated dessert. The recipe can be prepared in several flavors, including strawberry, vanilla, mango-style, and berry. While the exact carbohydrate amount depends on the ingredients you use, you can keep it very low in carbs by choosing a low-carb sweetener and unsweetened ingredients.
Ingredients
For the basic ice cream base:
- 2 cups heavy whipping cream
- 1 cup full-fat unsweetened Greek yogurt or cream cheese
- 1/2 cup powdered erythritol or another suitable low-carb sweetener
- 1 teaspoon vanilla extract
- 1/4 teaspoon salt
- 2 tablespoons unsweetened almond milk, only if needed for blending
Strawberry Flavor
- 1 cup fresh or frozen strawberries
- 1 tablespoon low-carb sweetener, optional
Vanilla Flavor
- 1 extra teaspoon vanilla extract
- 1/2 teaspoon vanilla bean paste, optional
Berry Flavor
- 3/4 cup raspberries or blackberries
- 1 tablespoon low-carb sweetener, optional
Creamy Fruit Flavor
- 1/2 cup unsweetened fruit puree or a low-carb fruit alternative
- 1/2 teaspoon vanilla extract
Equipment
You do not need an expensive ice cream machine for this recipe. A blender or food processor, mixing bowl, spatula, and freezer-safe container are enough. A shallow container works especially well because the ice cream freezes more evenly and is easier to scoop.
Step 1: Prepare the Base
Start by placing the heavy whipping cream, Greek yogurt or cream cheese, powdered sweetener, vanilla extract, and salt into a blender or food processor.
Blend everything until completely smooth and creamy. If you are using cream cheese, allow it to soften at room temperature first. This helps it blend smoothly without leaving small pieces in the mixture.
The mixture should be thick but still pourable. If it is too thick for your blender, add a small amount of unsweetened almond milk and blend again.
Taste the mixture before freezing. If you prefer a sweeter ice cream, add a little more sweetener. Remember that frozen desserts taste slightly less sweet once frozen, so the mixture can taste a little sweeter than you ultimately want.
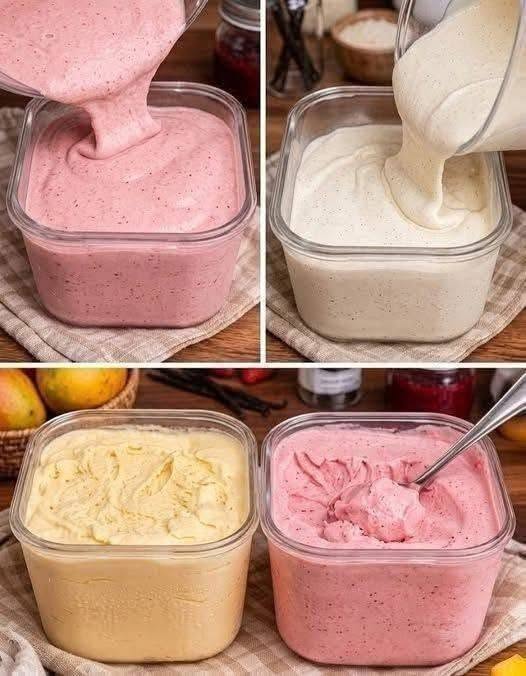
Step 2: Make the Strawberry Version
For strawberry ice cream, add the strawberries to the prepared base.
Blend until the strawberries are completely incorporated. If you prefer small pieces of fruit throughout the ice cream, blend only part of the strawberries into the base and finely chop the remaining berries. Fold the chopped berries in afterward.
Pour the strawberry mixture into a freezer-safe container and smooth the surface with a spatula.
Cover tightly with a lid or plastic wrap.
Step 3: Make the Vanilla Version
For a simple vanilla ice cream, keep the basic mixture as your base and add extra vanilla extract or vanilla bean paste.
Blend for another 20–30 seconds.
For an extra creamy flavor, you can add a little vanilla bean paste. The tiny vanilla seeds also give the ice cream a beautiful homemade appearance.
Transfer the mixture to a freezer-safe container, cover, and freeze.
Step 4: Make the Berry Version
Add raspberries or blackberries to the basic ice cream mixture.
Blend until the berries are smooth. If you want a stronger berry flavor, add a few extra berries.
For a smoother texture, strain the mixture through a fine-mesh sieve before freezing to remove most of the seeds.
Pour into a container, cover well, and place in the freezer.
Step 5: Freeze the Ice Cream
Place your containers in the freezer on a flat surface.
Freeze for approximately 4–6 hours, depending on the size and depth of your container. For the best texture, check the ice cream after a few hours.
If you are not using an ice cream machine, the mixture can become quite firm in the freezer. To make it easier to scoop, remove it from the freezer and allow it to sit at room temperature for about 10–15 minutes before serving.
For an even smoother homemade texture, you can stir the mixture once or twice during the first few hours of freezing. This can help reduce the formation of large ice crystals.
How to Get Extra Creamy Ice Cream
The secret to creamy homemade ice cream is enough fat and a smooth base. Heavy cream provides richness, while Greek yogurt or cream cheese gives the ice cream body and a slightly tangy flavor.
Using powdered sweetener instead of a coarse sweetener also helps keep the finished ice cream smooth.
Do not add too much liquid fruit puree because extra water can make the ice cream icy when frozen.
Serving Ideas
Once the ice cream has softened slightly, scoop it into bowls or small dessert cups.
For strawberry ice cream, top with a few fresh strawberry slices.
Vanilla ice cream is delicious with chopped nuts, unsweetened coconut, or a small amount of sugar-free chocolate.
Berry ice cream can be topped with fresh raspberries or blackberries.
You can also serve a small scoop of two different flavors together to create a beautiful homemade dessert.
Storage
Keep the ice cream in a tightly sealed freezer-safe container. Press a piece of parchment paper or plastic wrap directly against the surface before putting the lid on. This helps reduce ice crystals and freezer burn.
For the best texture, enjoy the ice cream within 1–2 weeks.
If it becomes very hard after several days, simply let it sit at room temperature for a few minutes before scooping.
Important Note About “Zero Carbs”
This recipe can be made very low in carbohydrates, but it is not automatically zero-carb. Ingredients such as strawberries, yogurt, cream, and other fruits naturally contain some carbohydrates. If you are following a strict keto or low-carb diet, check the nutrition labels of your specific ingredients and calculate the carbohydrates per serving.
Also, “eat as much as you like” is not a good assumption for any dessert. Even low-carb ice cream contains calories and fat, so it is best enjoyed in reasonable portions.
Final Result
The finished ice cream should be thick, creamy, and scoopable with a rich homemade texture. The strawberry version has a fresh fruity flavor, vanilla is smooth and classic, and berry gives you a delicious sweet-tart combination.
The best part is that you can prepare several flavors from the same basic recipe and keep them in separate containers. That way, you can have a different homemade frozen treat whenever you want without making a completely new recipe from scratch.