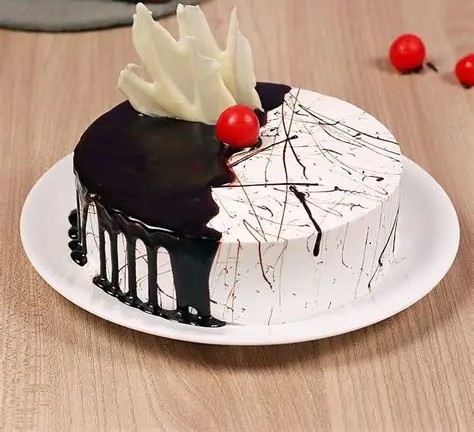

This elegant black and white chocolate drip cake is the perfect dessert when you want something that looks impressive but can still be made at home. With layers of soft chocolate cake, creamy vanilla frosting, smooth chocolate ganache, and a beautiful black-and-white finish, this cake is perfect for birthdays, celebrations, dinner parties, or simply when you want to make something special.
The combination of rich chocolate and creamy vanilla creates a delicious balance. The glossy chocolate drip adds a luxurious finish, while the white chocolate decoration and bright red cherries give the cake a beautiful bakery-style appearance.
Ingredients
For the Chocolate Cake
- 2 cups all-purpose flour
- 2 cups granulated sugar
- ¾ cup unsweetened cocoa powder
- 1 ½ teaspoons baking powder
- 1 ½ teaspoons baking soda
- 1 teaspoon salt
- 2 large eggs
- 1 cup buttermilk
- ½ cup vegetable oil
- 2 teaspoons vanilla extract
- 1 cup hot water or hot coffee
For the Vanilla Frosting
- 1 cup unsalted butter, softened
- 4 cups powdered sugar
- 2 teaspoons vanilla extract
- 3–4 tablespoons heavy cream or milk
- Pinch of salt
For the Chocolate Ganache
- 1 cup semi-sweet or dark chocolate, chopped
- ½ cup heavy cream
For the White Chocolate Decoration
- ½ cup white chocolate
- 1 teaspoon vegetable oil, optional
For Decoration
- Fresh cherries
- Extra white chocolate pieces
- Chocolate shavings, optional
Step 1: Prepare the Cake Batter
Preheat your oven to 350°F (175°C). Grease two 8-inch round cake pans and line the bottoms with parchment paper.
In a large bowl, whisk together the flour, sugar, cocoa powder, baking powder, baking soda, and salt. Make sure everything is evenly combined.
In another bowl, whisk together the eggs, buttermilk, vegetable oil, and vanilla extract.
Slowly add the wet ingredients to the dry ingredients. Mix until just combined.
Pour in the hot water or hot coffee gradually while mixing. The batter will become quite thin, but this is completely normal. Hot coffee can be used instead of water because it enhances the chocolate flavor without making the cake taste like coffee.
Divide the batter evenly between the prepared cake pans.
Bake for approximately 28–35 minutes, or until a toothpick inserted into the center comes out clean or with a few moist crumbs.
Remove the cakes from the oven and let them cool in the pans for about 10 minutes. Then transfer them to a wire rack and allow them to cool completely.
Step 2: Make the Vanilla Frosting
While the cakes are cooling, prepare the frosting.
Place the softened butter in a large mixing bowl and beat it for 3–4 minutes until light and creamy.
Gradually add the powdered sugar, about one cup at a time, mixing well after each addition.
Add the vanilla extract and a pinch of salt. Slowly add the heavy cream or milk, one tablespoon at a time, until the frosting reaches a smooth and spreadable consistency.
Beat the frosting for another 2–3 minutes until fluffy.
If the frosting feels too thick, add a little more cream. If it is too soft, add additional powdered sugar.
Step 3: Level the Cakes
Once the cakes are completely cool, use a serrated knife to carefully level the tops if they have domed during baking.
Place one cake layer on a cake board or serving plate.
Spread an even layer of vanilla frosting over the top.
Place the second cake layer on top and gently press it down.
Cover the entire cake with a thin layer of frosting. This is called a crumb coat and helps trap loose cake crumbs.
Place the cake in the refrigerator for about 20–30 minutes to allow the frosting to firm up.
Step 4: Create the White Cake Finish
After chilling, apply another thicker layer of vanilla frosting around the entire cake.
Use a cake scraper or offset spatula to smooth the sides and top as evenly as possible.
For the design shown in the picture, keep most of the cake white and smooth.
Don’t worry if it isn’t absolutely perfect. The chocolate drip and decorations will cover small imperfections and give the cake a professional appearance.
Once the cake is smooth, refrigerate it again for at least 20 minutes.
Step 5: Prepare the Chocolate Ganache
Place the chopped chocolate in a heatproof bowl.
Heat the heavy cream in a small saucepan over medium heat until it is hot and just beginning to steam. Do not boil it aggressively.
Pour the hot cream over the chocolate and let it sit for 2–3 minutes.
Stir slowly until the chocolate has completely melted and the ganache becomes smooth and glossy.
Allow the ganache to cool slightly before using it on the cake.
The ganache should be fluid enough to drip down the sides but not so hot that it melts the frosting.
Step 6: Make the Chocolate Drip
Spoon a small amount of ganache around the edge of the chilled cake, allowing it to naturally drip down the sides.
You can make some drips longer and some shorter to create a natural bakery-style appearance.
Once the edges are finished, spread a little ganache over part of the top of the cake.
For the black-and-white appearance, cover approximately one-third to one-half of the top with chocolate ganache while leaving the remaining portion white.
Use a spatula to gently smooth the chocolate section.
Place the cake back into the refrigerator for about 15–20 minutes so the ganache can set.
Step 7: Prepare the White Chocolate Decoration
Melt the white chocolate gently in the microwave in short intervals, stirring between each interval.
Alternatively, melt it over a double boiler.
Once melted and smooth, spread a thin layer onto parchment paper or a silicone mat.
You can create an abstract decorative shape by spreading the chocolate unevenly and allowing it to set partially before shaping it.
For a simpler decoration, make small white chocolate shards or curls.
Allow the chocolate to completely set before carefully removing the pieces.
Step 8: Add the Final Decorations
Once the cake is chilled and the ganache is set, carefully place the white chocolate decoration on top.
Add a few fresh cherries around the chocolate and white chocolate sections.
You can also add chocolate shavings, small chocolate curls, or additional white chocolate pieces to make the cake look even more elegant.
For the artistic splatter effect shown in the picture, use a small amount of melted chocolate and flick it gently across the white frosting using a small pastry brush or spoon.
Keep the splatter controlled so the design remains clean and elegant.
Tips for the Best Chocolate Cake
Use room-temperature ingredients whenever possible. Room-temperature eggs and buttermilk mix more evenly into the batter and help create a smoother cake.
Do not overmix the batter after adding the flour. Mix just until everything is combined. Overmixing can develop too much gluten and make the cake less tender.
Hot water or coffee is important because it helps bloom the cocoa powder and creates a richer chocolate flavor.
Always allow the cake layers to cool completely before frosting. If the cake is even slightly warm, the buttercream can become soft and difficult to work with.
For the chocolate drip, temperature is especially important. If the ganache is too hot, it can melt the frosting underneath. If it is too cold, it won’t drip properly. Let it cool until it is smooth and slightly warm but no longer hot.
Make-Ahead Instructions
This cake can easily be prepared ahead of time.
The cake layers can be baked one day in advance and stored tightly wrapped at room temperature or refrigerated.
The frosting can also be prepared ahead and kept refrigerated. Before using it, allow it to come back to room temperature and beat it again until smooth.
The fully decorated cake can be refrigerated for several hours before serving.
Take it out of the refrigerator about 20–30 minutes before serving so the frosting and chocolate ganache can soften slightly.
Storage
Store the finished cake in an airtight cake container in the refrigerator.
Because the cake contains buttercream, ganache, and fresh cherries, refrigeration is recommended.
It will stay delicious for approximately 3–4 days when properly covered.
If you are storing the cake overnight, add the cherries shortly before serving if possible. This keeps the fruit looking fresh and prevents excess moisture from affecting the frosting.
Final Thoughts
This black and white chocolate drip cake is one of those desserts that looks much more complicated than it actually is. The smooth white frosting, glossy chocolate drip, artistic chocolate splatter, white chocolate decoration, and bright cherries come together to create a beautiful centerpiece.
The best part is the flavor. The soft chocolate cake pairs perfectly with the sweet vanilla frosting and rich chocolate ganache. Every bite gives you a combination of creamy, chocolatey, and slightly fruity flavors.
Whether you’re making it for a birthday, anniversary, holiday, or simply because you want to bake something beautiful, this cake is sure to impress.
Once you get comfortable with the basic decorating technique, you can change the colors, toppings, chocolate design, and fruit to create your own version. It doesn’t have to look exactly perfect—the handmade details are what make it special.