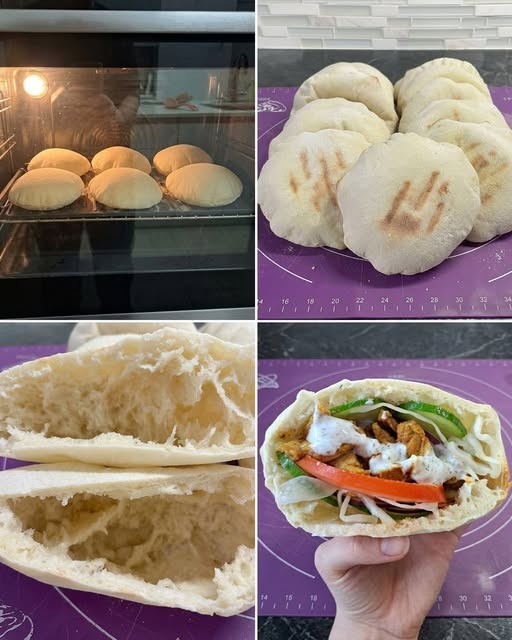

There is something incredibly satisfying about making homemade pita bread from scratch. Watching each little dough round puff up in the oven and turn into a soft, hollow pocket feels almost magical! These homemade sourdough pita breads are tender, fluffy, and perfect for stuffing with grilled chicken, fresh vegetables, hummus, or your favorite sandwich fillings.
If you love sourdough baking, this recipe is a wonderful way to use your active sourdough starter. The dough develops a lovely flavor during fermentation, and the finished pita breads have a soft texture that makes them perfect for everyday meals. You can even prepare the dough the night before, allowing it to ferment slowly in the refrigerator for extra flavor and convenience.
The best part is that you do not need any special equipment. A mixing bowl, rolling pin, baking tray, and a very hot oven are enough to make delicious homemade pita bread.
Ingredients
This recipe makes approximately 8 medium pita breads.
- 500 g (4 cups) all-purpose flour or bread flour
- 100 g (about ½ cup) active sourdough starter, bubbly and recently fed
- 300 g (1¼ cups) lukewarm water
- 10 g (1¾ teaspoons) salt
- 15 g (1 tablespoon) olive oil
- 10 g (2 teaspoons) honey or sugar, optional
A quick note: Flour absorbs water differently depending on the brand and type. If your dough feels unusually dry, add a little more water, one teaspoon at a time.
Step 1: Mix the Dough
In a large mixing bowl, combine the lukewarm water and active sourdough starter. Stir until the starter is mostly dissolved into the water.
Add the flour, salt, olive oil, and optional honey or sugar. Mix everything with a wooden spoon or your hands until a rough dough forms. Make sure there are no large pockets of dry flour remaining.
The dough may feel slightly sticky at first, which is normal. Avoid adding too much extra flour because a dough that is too dry can produce stiff pita breads that do not puff properly.
Cover the bowl and let the dough rest for approximately 20–30 minutes. This resting period allows the flour to absorb the water and makes the dough easier to knead.
Step 2: Knead Until Smooth
Transfer the dough to a lightly floured work surface. Knead it for approximately 5–8 minutes, or until it becomes smoother, softer, and more elastic.
You can also use a stand mixer fitted with a dough hook if you prefer. The finished dough should be soft and slightly tacky but manageable.
Place the dough back into the mixing bowl and cover it with a lid, plastic wrap, or a clean kitchen towel.
Step 3: Allow the Dough to Ferment
Leave the dough at room temperature until it becomes noticeably puffy and increases in size. Depending on your starter’s strength and the temperature of your kitchen, this may take approximately 3–6 hours or longer.
You do not necessarily need to wait for the dough to double completely. Look for visible expansion, a softer texture, and small bubbles in the dough.
For an overnight method, let the dough begin fermenting at room temperature for around 1–2 hours, then cover it well and transfer it to the refrigerator overnight. The exact timing depends on how active your starter is and how warm your kitchen is.
The following morning, remove the dough from the refrigerator. If it is still very cold and firm, allow it to sit at room temperature until it becomes easier to divide and roll.
Important: Overnight refrigeration slows fermentation but does not stop it completely. If your dough is already very active, refrigerate it sooner to prevent over-fermentation.
Step 4: Divide the Dough
Turn the fermented dough onto a lightly floured work surface. Divide it into 8 equal portions, approximately 110–115 g each.
Shape each portion into a smooth ball by gently pulling the edges underneath and rolling it against the work surface.
Place the dough balls on a lightly floured tray and cover them with a clean towel. Let them rest for 20–30 minutes.
This resting time relaxes the gluten, making each piece much easier to roll into a round shape without shrinking back.
Step 5: Roll the Pita Breads
Take one dough ball and place it on a lightly floured surface. Using a rolling pin, roll it into a circle approximately 6–7 inches in diameter and about ¼ inch thick.
Try to keep the thickness as even as possible. This is one of the most important secrets to getting pita bread to puff properly.
If the center is much thicker than the edges, or if the dough is unevenly rolled, the pocket may not form correctly. Avoid making the dough rounds too thin, and do not stack them without flour or parchment between them.
Cover the rolled rounds while you prepare the oven so they do not dry out.
Step 6: Preheat the Oven Properly
Preheat your oven to its highest suitable temperature, ideally around 475–500°F (245–260°C), if your oven allows it.
Place a heavy baking tray, baking steel, or pizza stone inside while the oven heats. Let it become thoroughly hot for at least 30 minutes.
A properly heated baking surface is essential because pita bread needs a sudden burst of heat to create steam inside the dough. That steam separates the layers and creates the hollow pocket.
If your oven does not reach these temperatures, use its highest setting and allow extra time for preheating.
Step 7: Bake Until They Puff
Carefully place one or two rolled pita rounds onto the hot baking surface. Bake for approximately 2–4 minutes, depending on your oven and the thickness of the dough.
Watch closely as they begin to inflate. Some pita breads puff dramatically within a minute or two, while others take a little longer.
Once fully puffed and lightly colored, remove them carefully using a spatula or tongs. Do not overbake them, because excessive baking can make the bread dry and crisp rather than soft and flexible.
Continue baking the remaining rounds in batches, allowing the oven to recover its heat between batches if necessary.
If your pita breads do not puff on the first try, check that the oven and tray are hot enough, the dough was rolled evenly, and the dough has not become too dry.
Step 8: Keep the Pita Breads Soft
As each pita comes out of the oven, place it immediately inside a clean kitchen towel or a covered container. Stack the breads together and keep them covered while the remaining batches bake.
The trapped warmth allows a little moisture to redistribute through the bread, helping the pita stay soft and flexible.
Once the breads have cooled slightly, gently open one along the edge to check for the characteristic hollow pocket.
Avoid leaving freshly baked pita exposed to the air for too long, as it can dry out quickly.
Step 9: Prepare a Delicious Pita Filling
These homemade pita breads are perfect for making a quick chicken sandwich.
For a simple filling, combine cooked grilled chicken with sliced tomatoes, cucumber, lettuce, thinly sliced onion, and your favorite sauce.
You can make a creamy sauce using plain yogurt, minced garlic, lemon juice, a pinch of salt, and black pepper.
Carefully open a pita pocket and fill it with the chicken and vegetables. Add the sauce just before serving so the bread does not become soggy.
You can also fill these pita breads with falafel, roasted vegetables, scrambled eggs, hummus, or leftover grilled meat. They are versatile enough for lunch, dinner, meal preparation, and packed lunches.
Storage Instructions
Allow leftover pita breads to cool completely before storing them.
- At room temperature: Keep in an airtight bag or container for up to 2 days.
- In the refrigerator: Store in an airtight container for approximately 4–5 days, although refrigeration may make them firmer.
- In the freezer: Freeze in a sealed freezer-safe bag for up to 3 months, separating the breads with parchment paper if desired.
To reheat, sprinkle the pita lightly with water and warm it in a covered skillet for a short time, or wrap it in foil and heat it in the oven until soft.
Frozen pita breads can be thawed at room temperature or reheated gently from frozen.
Helpful Tips for Perfect Sourdough Pita Bread
Use an active starter. A bubbly starter that has recently risen after feeding generally gives the dough better fermentation.
Pay attention to fermentation. Sourdough timing varies with temperature and starter strength, so use the dough’s appearance and texture rather than following the clock alone.
Roll evenly. Consistent thickness helps the bread inflate into a pocket.
Preheat thoroughly. A very hot oven and baking surface are crucial for a good puff.
Keep the dough covered. Dry surfaces can interfere with the dough’s expansion and make rolling difficult.
Do not overbake. Short baking times help keep the pita soft and tender.
Final Thoughts
Homemade sourdough pita bread is easier to make than many people expect. With a little planning, you can prepare the dough the night before and enjoy freshly baked, soft, fluffy pita breads the next day.
The slow fermentation develops flavor, while the high baking temperature creates the beautiful hollow pockets that make pita bread so useful for sandwiches and wraps. Even if your first batch is not perfectly puffed, small adjustments to the dough thickness, fermentation, and oven temperature can make a real difference.
Serve these warm pita breads with grilled chicken, fresh vegetables, creamy garlic sauce, hummus, or your favorite fillings. Once you get comfortable with the method, homemade pita can easily become a regular part of your baking routine!
Have you ever tried making sourdough pita bread at home? Share your experience and favorite fillings in the comments!